Thatch Buildup and Raising Sprinkler Heads
This is about my thatch buildup and raising sprinkler heads solution. I needed to raise my sprinklers. After forty years the thatch/soil buildup has finally started to impact how my sprinklers do their job. Unfortunately for me, this is going to be a tough job. My trees are well established and there are roots all over that lawn area. This will be a simple job with a lot of work attached to it. I’m going to need to cut roots and then dig them out just to get the old sprinklers loose.
Why I chose six-inch rise sprinklers
I intend on replacing my two-inch rise sprinklers with some six-inch rise models. There are two reasons why I chose the six-inch sprinkler. I have a bluegrass/fescue lawn and the lawn needs to be very tall(3.0-3.5 inches) every summer so that it does not burn from California’s Central Valley summer heat. So that means that a four-inch rise sprinkler won’t cut it after a few seasons. I need a sprinkler with a six-inch rise to always clear the tallest blades of grass.
I also need a six-inch rise sprinkler body because some of these models can have two inlets which will simplify the installation. One inlet at the usual location and another inlet on the side of the sprinkler body. A six-inch sprinkler with two inlets because there are no two inlet models in a four-inch rise sprinkler.
By now, you may be asking, how have my two-and-a-half-inch rise sprinklers been working until now?
What’s been successful?
Well, that’s a good question. For many years when I use my weed eater to edge the lawn, I have been cutting a clear section around each sprinkler. Keeping the grass away from the sprinklers has allowed me to extend the time for raising them for many years. Over the years that clear space around each sprinkler has gotten larger and larger. But this summer the clear sections of the lawn around each sprinkler just didn’t work the way I had intended them to. It became clear that the thatch/soil buildup had finally reached the point where I was going to need to act.
Swing joint
I had been thinking about using what they call a swing joint. It makes changing the elevation of a sprinkler extremely easy. But what I don’t care for is that the design of the swing joint causes the location of the sprinkler to change. It may be by only a few inches but it still changes.
My preference is that the sprinkler goes back in the same spot or very nearly the same spot(less than an inch in change). The reason for my preference? Since I won’t change the sprinkler location I don’t have to worry about water coverage since my old sprinklers were originally installed to provide good water coverage.
My Introduction to Flexible Pipe and Barbed Elbows
In the above video, he uses barbed elbows and a good length of flexible riser pipe to create a circle that brings the sprinkler back to the original location. I like how he installs the pipe in a circle which makes it super easy to get the sprinkler head back to the original location. Just what I was looking for.
But I prefer the dual inlet sprinkler body because I can bring the flexible pipe back to the side inlet on the sprinkler body without worrying about interference from the PVC pipe or PVC fittings with the barbed fitting. If you pay attention to the video, where he is installing his new sprinkler, the barbed fitting is very close to the PVC pipe(time stamp 5:40 on the video) for the final elevation. A side inlet sprinkler model will give you that extra bit of clearance that can make it super easy to install.
I also need to know how tight a circle that the pipe can achieve without kinking. Knowing the smallest circle’s diameter will let me know how many sprinklers I can install from a ten-foot roll(the smallest length of piping I could find) of the flexible riser pipe. An approximate length for each sprinkler came out to about twenty-four inches.
 Very large roots cut with reciprocating saw and pruning blade
Removing the sod
This installation calls for removing the sod. I can easily cut down through the sod with a trenching shovel. But it will be harder to get through all the roots from my trees. A pair of hand pruners used with a garden transplant trowel took care of the smaller roots and digging the small hole around each sprinkler. For really large roots(too large for the hand pruners) I used my Sawzall(reciprocating saw) with a pruning blade. You can see how well this tool works in my article: No Work Shrub Stump Removal. A set of loppers easily cleared some of the medium sized roots that my hand pruners couldn’t handle. After all the roots were cleared I removed the riser and the old sprinkler.
 Funny pipe connected to PVC pipe with barbed elbow adapter
Loop or U shaped?
I was going to use a loop of the flexible pipe(like in the video) to get the sprinkler back to its original location. But I found a much easier way by changing the barbed connectors and using a dual-inlet sprinkler body. These small changes made it super simple to get the sprinklers back to their original locations. Also because I used the side inlet it removed any chance of kinking the flexible pipe because of the distance between the PVC pipe barb connector and the side inlet connection. No loop required, just a simple u shaped section of flexible pipe and my sprinklers were back in place.
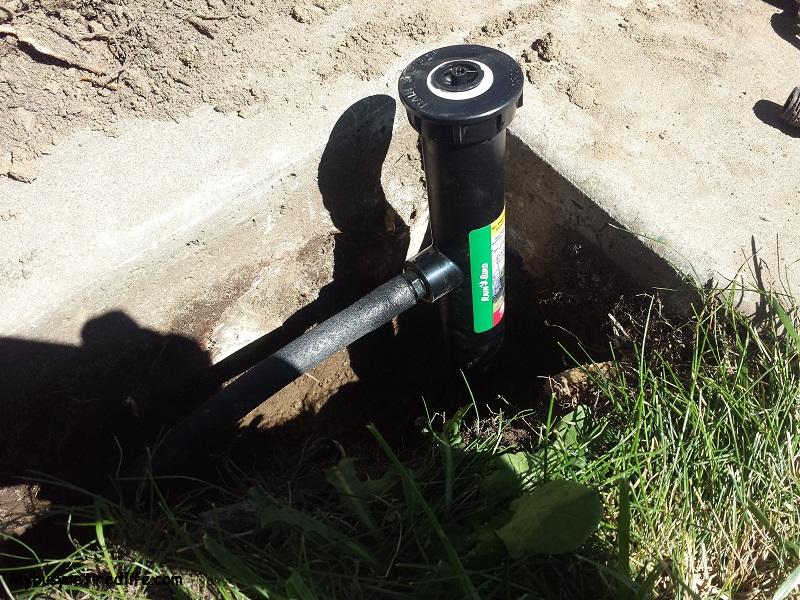 Funny pipe connected to side inlet with straight barb adapter
No clamps are needed for any of the flexible pipe connections the barbed fittings work really well without them.
 Six-inch rise sprinkler clears tall grass
Conclusion
My new sprinklers are working great. They clear the tallest grass leaves easily. I no longer need to trim the grass around each sprinkler. The side inlet used with the flexible pipe and barbed fittings made the installation very easy. I like my thatch buildup and raising sprinkler heads solution.
Related Article: Lawn Aeration and You
(Mybusyretiredlife.com All Rights Reserved)
(Mybusyretiredlife.com All Rights Reserved)
(Mybusyretiredlife.com All Rights Reserved)
(Mybusyretiredlife.com All Rights Reserved)
(Mybusyretiredlife.com All Rights Reserved)
Liked This Post? You May Like These:
