DIY Rain Gutter
I need a DIY rain gutter and it needs to match my existing gutters. Putting up something less than a full match will only scream out “Look at me I’m different”. Well, it will scream out to me. I’ll need one more thing. It will be important to remove the gutter in one piece, not cut up. More on why this is important later.
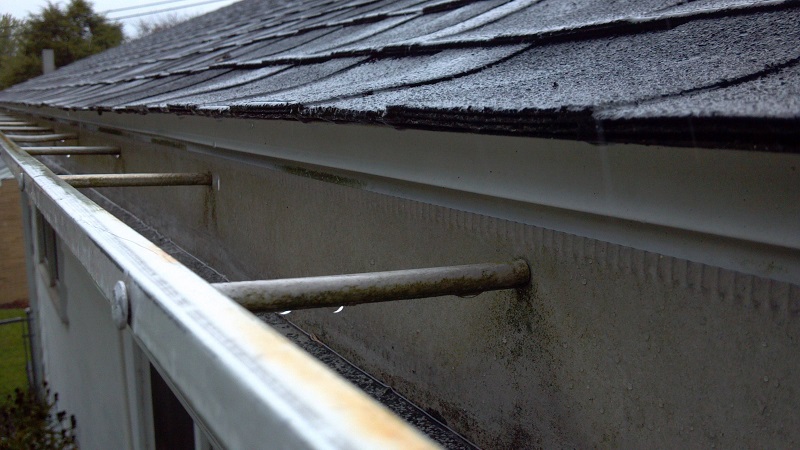
Rain gutter with spike and ferrels
Criteria for the new gutter
I’m going to need a good eye for detail on the existing gutters. The new gutter is a replacement gutter so that means the details must be exact.
The mounting needs to be the same. I need to use spikes and ferrules(see photo above) as that is what is on my old gutter. Also, that means the ends must extend past the roofline edge by an inch and the end cap angle of the new gutter must match exactly. I’m going to need a template to match the ends perfectly. All of my gutters are made of steel so that is the material I am going to be working with, but the methods used in this article will work with any type of gutter material.
This is a simple DIY rain gutter(basically a straight gutter with no inside or outside turns). Using off the shelf parts makes this a nice project that I can handle by myself with only some help needed for the removal and installation for hanging the gutter. The majority of the work is accomplished on the ground on a set of saw horses.
Tools needed
- A pair of sawhorses
- A drill and drill bit sized for pop rivets
- Angle grinder with a cutting wheel
- Tape measure
- Caulking gun
- Throw away paint brushes
- Pop rivet gun
- Rubber mallet
How to create a template for the gutter end
Template the ends of the gutter if needed. If you need a template for the end of your gutter this is the method I used to create one. Template for the gutter end.
Criteria for a duplicate gutter
I looked closely at the gutter and this is what I found. The end of the gutter is cut at an angle and the top of the gutter is extending beyond the roofline by about an inch. This gutter is a simple straight gutter with no inside or outside turns.
Remember that the gutter was taken down in one piece? I’ll need to make sure that the mounting spikes are in the same location and that the downspout is going back into the same place.
I can take measurements from the old gutter and transfer them to the new gutter. All of this done while on the ground on a set of sawhorses.
A few upgrades
There have been some new materials introduced since the old gutter went up. I’m going to incorporate these new materials into the new gutter. They will improve the life of the gutter for many years and are not visible.
I intend to use a silicone-based gutter sealant at the seam, end caps, and outlet to seal them. The upgrade is going to be a rubberized paint inside the gutter that will shield the metal from corrosion. But before I apply the rubberized coat the whole thing is covered in a red oxide primer for added rust protection of my new steel gutter. I have chosen a brush on primer so no fancy equipment is needed. Just a throwaway paintbrush and some sawhorses on which to place the gutter while it’s being assembled and painted.
Creating a good splice
The gutter material comes in standard lengths. My new gutter is going to be longer than that standard “off the shelf” length. So somewhere along the gutter, there will need to be a splice. I could buy a splicing piece made by the manufacturer. But I’ve used those before and they make for a very flimsy gutter and worse they look very bad. Creating a good strong(non-flimsy) splice in the gutter without it being obvious is my goal. This splice will need a special technique. The execution of this technique will leave you with a professional installation look to the finished gutter.
Related Article: A Strong Rain Gutter Splice Technique
The splicing technique demonstrated in the above article is very strong. The two pieces of the gutter overlap by twelve inches. This creates a very strong non-flimsy splice. The splice is not obvious from the ground. Also, I like that the rivets holding the splice together are not visible from the ground. I used this spicing technique and it is simple, extremely strong and very easy to execute.
Which end shows
I noticed that when the two pieces came together at the splice the end that had not been cut was on the inside. If you’re not very good at cutting a straight line your cut is going to be visible if it is on the outside of the splice. I would recommend that the uncut factory end be visible(on the outside of the splice) to get the best finished look. This means that you will need to notch the factory uncut piece as that is the part of the gutter that will show.
One last thing on splice location
Installing End Caps
A short video below on installing end caps gives you the how-to and reasons for the proper application of the silicone caulk. He also has a few suggestions on how best to attach the end cap to the gutter.
Downspout Outlet/pop rivets
Downspouts and elbows are made to slip together. When assembling downspouts, the piece on top slides into the next lowest piece, and right on down the line, so water won’t leak out as it flows down the spout. REPLACING GUTTERS AND DOWNSPOUTS
This second video shows you how to attach different types of outlets to the gutter using a different method.
Materials needed
- Straight run sections
- 2 end caps
- Downspout outlet
- A template for cutting the ends.
- A tube of silicone sealant
- Red oxide primer
- Rubberized paint
- Steel Pop Rivets 1/8″ by 1/4″ grip
Specification sheet for Valspar® Anti-Rust Red Oxide Primer
How to create the DIY rain gutter
Prework
- Make any templates that you may need.
- Measure the gutter length(all measurements should be taken from the same end of the existing gutter) and recorded.
- If your gutter is using spikes and ferrules measure to each spike and record.
- Measure from the end of the gutter to the downspout and record it.
- Carefully remove the old gutter from the house.
Create the gutter
- Layout the old gutter on a set of sawhorses.
- Use the template and mark and cut the angle needed for each end cap.
- Install each of the end caps with silicone and pop rivets.
- Measure for the two pieces(if you need a splice) making sure to include your overlap and cut.
- Notch the uncut gutter piece.
- Join the two pieces together and verify the overall length is correct to adjust(slide in or out as needed) as necessary.
- Mark the gutter at the inside edge and take them apart and apply the caulk.
- Assemble the two pieces and drill and pop rivet.
- Cut the downspout hole and attach the outlet with silicone and pop rivets.
- Drill holes for spikes in the face of the new gutter as per previous measurements.
At this point, your DIY rain gutter should be complete. Paint as needed.
Downspouts
Any DIY rain gutter is not complete unless it has a downspout. There are two options for downspouts. You can buy the pieces to make your turns/elbows as needed or you can create your own turns/elbows as illustrated in the two videos below.
I find it easier to use off the shelf pieces to create a new downspout. For this project, I reused my existing downspout. I simply used new downspout bands to reattach the downspout to the house.
If you’re going to create your own downspouts from straight run material then the two videos below will show you how to create them using a square and tin snips. Creating downspouts is all about measurements from the gutter to the wall and the downward run to the last turn away from the house.
Once you have those measurements then it’s time to cut the material. Be sure that you make the cuts to keep the seam out of sight. Make certain that you know where the parts will be before making that cut. The old adage measure twice and cut once is very applicable.
Part One
This video shows the techniques for creating the elbows. He mentions the safety equipment(gloves) needed.
Part Two
Conclusion
Related Articles: Why Choose Steel Rain Gutter
Screens and Cleaning Out the Gutters
Liked This Post? You May Like These:
