How To Cure Garlic
How to cure garlic. You’ve grown it, you’ve harvested it, now what do you do? You’re going to need to cure it if you want it to last.
 Curing garlic bulbs
Why do you Cure Garlic?
The curing process gives the bulbs time to thoroughly dry and adjust to conditions for long-term storage. The benefits of curing are, improving storage time, drawing raw nutrients and sugars from the leaves into the bulb, and helping to control mold and mildew.
Conditions Needed for Curing
Curing is important but finding the conditions for curing can be challenging. Curing requires good ventilation. High temperatures should be avoided. Direct sunlight(produces a flavor change) is a no-no. Also no rain(bulbs must be kept dry) during the entire drying process.
Equipment needed for curing
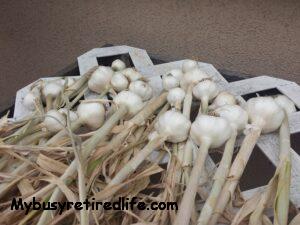
The ideal conditions for curing can be achieved by placing the bulbs on a wire mesh(for ventilation) covered with a shade cloth to prevent sun exposure, with the ends of the structure open to provide more ventilation, and a roof to prevent rain from falling on those beautiful heads. Improvisation was called for in my case. I have no such structure to cure garlic. I have seen old window screens, old bed springs, and rafters used to hang the drying bulbs. So I needed to be resourceful.
I reused a DIY garden tool cart I was no longer using because it had plenty of ventilation in its plastic lattice. The lattice was elevated so there was an air gap of at least three feet below it to the next level. I parked it on the north side of my home against my garage wall as there would be little to no direct sun exposure. See the photo below.
 Curing garlic on an improvised drying rack
I didn’t need a tarp to cover it. The cart being pressed against the north side of the garage wall gave it plenty of shade with no exposure to the sun. Again because I live in central California where the chance of rain anytime after April is almost non-existent a roof was not needed. If you have a possibility of rain you are going to need a cover to keep those bulbs dry. I laid out the garlic in a single layer to make sure each head had plenty of ventilation. Ventilation, check, no sun exposure, check, no rain exposure, check, I have all the conditions met.
The following video has what I would consider the “best of class” for a garlic drying rack. It has it all. There is a roof to keep the rain off the garlic. There is a shade cloth providing sun and rain protection. The racks are wire to provide great top/bottom ventilation. The sides are also open to provide ventilation. A structure like this is in my future.
How to Cure Garlic Two-part Process
Curing is a two-part process. It takes 5-7 days for the first part. At the end of this first drying period, the stems and leaves will have started to dry(they will still be soft indicating that moisture is present), but the roots should be dry. If you have the time you can trim the roots away(leave 1/8 to 1/4″ of the roots on each head). A nice pair of scissors works well for this task. However, you can wait until the foliage is completely dry to trim the roots and the foliage all at the same timeolpppppppppppppppppppp.
Whether you choose to trim the roots before the foliage is dry or after, follow these steps. Brush away(use a soft nylon-bristled brush, an old paintbrush is a good choice) any dirt at the roots and bulb area. The outer paper-like skins covering the head may come off when brushing the garlic. This is okay, but don’t purposely remove any layers covering the heads until the foliage is completely dry. The head of garlic should look clean without any dirt. If you’re removing the roots before the leaves are dry place the heads of garlic back on the wire mesh and allow 1-2 weeks of further drying time.
The second part of the drying process is when the foliage gets completely dry. When the outer skins are dry and crispy, and the neck and any leaves are thoroughly dry, the drying process is complete. Clean and trim the roots. Cut the stem about an inch above the bulb.
The following video demonstrates the cleaning and root/leaf cutting.
Storage
The curing process is complete. Store your garlic by your preferred method. I prefer to dehydrate it. It can last for years in vacuum-sealed mason jars. We peel the skins, run the cloves through the Vidalia Food Chopper’s small grid, and then dehydrate the pieces at 115º(produces a light color). Then I fill the mason jars, vacuum seal them with the Foodsaver with a jar adapter, and label the lids with the current month and year and they’re good for years. If we need garlic powder or granulated garlic our coffee grinder will produce whatever we need.
I’m very interested in learning what you use for a drying rack to cure garlic. In the comment section let me know how you cure garlic and your preferred method of storing your garlic long term.
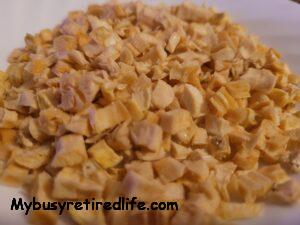 Dehydrated Garlic at 115 degrees
Related Article: Build Raised Garden Beds On The Cheap
(Mybusyretiredlife.com All Rights Reserved)
(Mybusyretiredlife.com All Rights Reserved)
Liked This Post? You May Like These:
