Building an OTA Antenna system
Building an OTA antenna system is all about cutting the ties to cable/satellite television or limiting how deep they get into your wallet. The last analog TV broadcast in the United States ended June 12th (Friday), 2009. With the introduction of digital TV, the number of over-the-air network channels has dramatically increased.
OTA
“Over-the-air” is a synonym for “wireless”
So the first step to building an OTA antenna system should be a question:
How to I know which antennas are High Definition antennas and which ones are analog TV antennas? It is a common misconception that only certain antennas are capable of receiving HDTV. The truth is that HD signals are broadcast on the same VHF and UHF frequencies that have been used since the beginning of broadcast TV. All antennas have the ability to receive HD Broadcast, just be sure to pick one that covers the frequency range (VHF or UHF) that is being used in your area. https://www.solidsignal.com/p/?p=2789#antennac8
Now you know there are no special antennas needed for HD, or 4K. The only mystery in building an OTA antenna system has just been cleared up. The antenna doesn’t care whether the signal is HD, 4K, or analog as long as it is the same frequencies(UHF/VHF) it is built for it is going to pick it up and deliver it to your television. With this piece of knowledge, no one is going to talk you into “upgrading” into a high priced piece of hardware that is totally unnecessary. Any other equipment that may be needed is just that it is needed or not needed. No more mysteries.
But you will need some additional information.
Splitting the signal can result is a 50% drop in signal strength. Every additional split down the line will continue to degrade the signal’s strength.
Set your OTA system goals
You’re going to need some well-defined goals. It is these goals that will determine what your antenna system will look like when complete and determine the system’s capability.
Broadcast towers
One of the first steps to getting free OTA TV is to find the location of the transmitter towers are in your area. Be sure to take notes on the channel number, distance in miles, degrees, whether it is UHF or VHF, and the color of the signal. Once you have this information, you can tell which channels are being broadcast. The direction they are coming from and how far they are from your home. Also the location(how far apart) of the towers in degrees.
You also now know whether you may need an antenna rotator should you want to receive these channels. If there is more than one TV in the house used at the same time you may need multiple antennas so as not to disturb one set of signals in favor of another set of signals.
In addition, you will know whether these channels are UHF or VHF. This will determine what type of antenna(single or dual band) you will need. Channel Master has a good tool to get all this information for you.
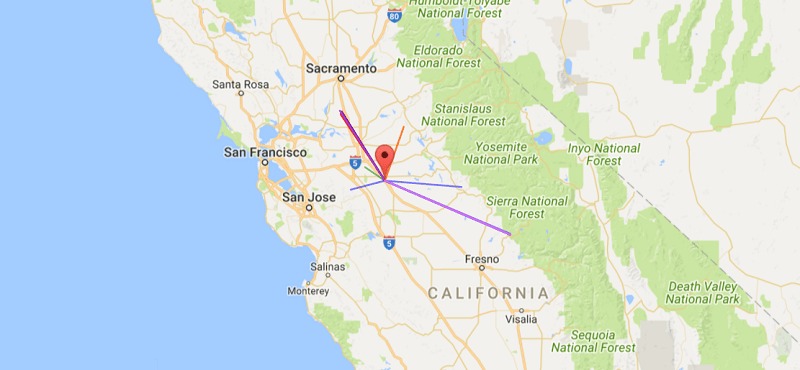
Screenshot of broadcast towers near my location
Ok, now you should have all the information you need to start developing your goals.
Possible Goals
- Get OTA channels from your area and beyond.
- Be able to point the antenna to the television tower(your favorite viewing channel) you wish to view.
- Get the most channels to view.
- Get the strongest signal to your television.
- Distribute the signal thru out the house.
- Be able to record OTA channels without monthly fees.
- Be able to stream OTA channels to every wifi device you own.
What you are going to need
- An antenna capable of getting the channels you want
- A telescoping steel antenna mast with roof mounting and guy wires(if taller than ten feet). The higher the antenna the better the signal strength.
- A preamplifier to deliver the strongest signal from the antenna(equals more OTA channels) to the house. The weaker(towers farther away) channels will be present with a better signal thru amplification.
- A rotator box for antenna pointing(if needed).
- Coax cable(RG6 instead of RG59) to prevent signal contamination and improved longevity.
- Coax connectors for each end of your cable runs(custom lengths= shortest cable length=better signal).
- Signal splitter to divide the signal to each desired location.
- Signal amplifier(if needed) to keep the signal at acceptable levels to each location within the house.
- An OTA recorder to be able to record and playback your favorite shows.
- A wireless device that will stream your OTA signal to your router.
Finally, with all your goals developed you can start looking for equipment for your project.
Antenna Selection
Selecting an antenna is all about distance from the towers to you and how far apart the towers are. The type of broadcasts(UHF, VHF) you wish to receive also deserve consideration. Gain is a term used in antennas so what is it?
Antenna gain is the ratio of the signal received from the preferred direction to the signal from an ideal omnidirectional antenna. Gain is inversely proportional to the antenna’s acceptance angle.
In simple terms tv signals get weaker over distance, the further away you are from a television transmitter, the higher the antenna gain you’ll need to receive a good quality picture on your TV set. Gain is a measurement of the antenna’s ability to capture the broadcast signal. Television antenna gain is important if you need to route the signal from your antenna to more than one TV. The signal when split will be weaker.
Distance from towers
If you’re lucky enough to live within 30-35 miles from the towers you want you can probably get by with an indoor antenna. As long as you can point the antenna in the right direction your signal strength should be fine. Any towers further away than this and you will need an outdoor antenna. Next, determine your tower to tower spacing in degrees(see video below on how to determine spacing) and then check which antennas will work with the tower spacing.
That’s it you have distance, spacing, type of bandwidth(UHF/VHF), and know what type of gain you will need to get the best possible picture.
Mounting the antenna
Outside Antennas should be properly grounded for best reception and safety.
You will need to decide where you want the antenna located on your home. Remember that indoor types have a lot of signal loss due to the materials surrounding them. Also if the antenna is placed in an attic you may find that your signal loss may be half, again due to the roofing materials.
There are many ways to mount the antenna. You can mount it on a chimney, or off the eaves of the house. If you do a roof mount, as long as you use a silicone sealant for the penetrating screws you will remain waterproof.
Your mast provided it is below ten feet tall will not need guy wires. Any height greater than ten feet will need guy wires to support it. The roof mount mast can be a tripod mount or a standard single point(with guy wires) unit.
Attenuator (electronics)
An attenuator is an electronic device that reduces the power of a signal…An attenuator is effectively the opposite of an amplifier…While an amplifier provides gain, an attenuator provides loss…
Preamplifier
I believe in installing a preamplifier as usually, my antenna sits on a forty-foot mast so my cable run from antenna to the ground usually exceeds fifty feet. At that cable length(greater than 30 feet), the signal needs to be boosted and pushed.
So how did I arrive at needing a preamp? Here’s how most of the towers are more than 50 miles away. The coax cable run from my antenna to the house is greater than 30 feet and last I intended to split the signal soon after entering the house.
Also, a preamp will ensure the longevity of the system by boosting and pushing the signal for a very long time. This part becomes more important over time as the antenna gets older and starts to lose some of it’s gain due to corrosion.
Remember the color of each station that is in your notes? Well, this is where they come in handy in determining how much gain you will need from your preamp. Check the colors of the channels and your proposed cable runs to determine which model of preamp will be best for your installation.
Too much good stuff, signal overload
If the signal is strong from the tower and a high gain preamp is installed on a short run of coax too much amplification can overload the television tuner and cause the TV tuner not to receive the channel.
Rotator
A rotator will allow you to point the antenna to the desired tower. The rotator box has built-in presets(up to 69). Once the antenna has the strongest signal the remote is programmed. Then you will always be able to swing the antenna back to that same spot. But if you are watching two TVs one of them may lose signal strength. If all your channels are in the same 30º span you’re in luck, you may not need a rotator.
In my case, I have a rotator. When a football game is being blacked out in the bay area(see tower location screenshot above). I can rotate the antenna towards Fresno where there is no blackout.
It is possible to also get a bad picture if the signal strength of the TV transmitter is too high. An attenuator inserted in the antenna lead-in wire may be used if the television receiver displays signs of overload in the RF front end.
Coax cable
There is only one cable you want for your system. It is RG-6 it is the industry standard for the best longest lasting cable you can get. RG-6 cable comes in two different versions of conductors. There is the solid core copper conductor and the copper-clad steel version(usually cheaper). Solid copper conductors are better at transmitting power over the cable run over the copper-clad steel version. It is shielded which prevents unwanted signals from being added to your signal on the way from the antenna to your TV. You will need to decide if you want to ground the cable. An RG-6 coax version with an attached ground wire is available. My cable is grounded from the antenna’s mast to the ground rod for my home.
Whatever your choice make sure that there is a drip loop in the cable before it enters your home.
RG-6
The most commonly recognized variety of RG-6 is cable television (CATV) distribution coax, used to route cable television signals to and within homes, and RG-6 type cables have become the standard for CATV, mostly replacing the smaller RG-59, in recent years.
Coax cable connectors
Coax cable connectors have come a long way. The compression type connector is really easy to install. If you use the proper tools for cutting the cable, proper stripping of the materials and the use of the compressor tool makes the job super easy. Custom cable lengths are easily attained. Any connectors you choose should be weatherproof if your antenna is outdoors.
Splitters
Using more than one TV will require a splitter. The splitter is going to divide your signal and send it in different directions. If you want a TV in each room of the house you will need a splitter that can handle the need. I have a splitter in my garage after my antenna cable enters the house. One side of the splitter goes into the family room. The other side goes to a closet at the end of the house that has another splitter for the other rooms in the house.
DVR/Wireless household
I found a great article comparing the available DVRs for OTA systems. The article is pretty recent as it was first published on May 19, 2017. It gives you a comparison of five OTA DVRs. If you would rather go wireless, and stream your OTA signal across your entire home, to every WiFi connected device, then check out the HDHomeRun or the Tablo. I have the Tablo Quad with a one terabyte drive.
Luckily, nowadays there are some good over the air (OTA) DVR options available that allow you to record, pause, skip, and playback all channels you receive through your antenna. Here’s a look at the best OTA DVR options currently available for cord cutters. This guide has been updated as of 2017 and now includes detailed DVR reviews of the top options.
From OTA DVR Comparison for Cord Cutters: Best OTA DVRs of 2017
Update on Cutcabletoday.com 8/24/18
It seems that the website is no longer available. All links to that site have been broken. Here is an article from CNET.com on their take on the best DVR’s for OTA systems for 2018.
Related Article: A OTA Television guide for your tablet
(Mybusyretiredlife.com All Rights Reserved)
Liked This Post? You May Like These:
