How to clean headlights
How to clean headlights was something I needed to learn recently. I had to venture out on an errand in the evening. It was after sunset when I was on my way home that I noticed my headlights being dim. The bulbs had recently been replaced so I knew that it was not old age that was causing the dimness. I knew that my headlights were not in the best of shape so cleaning them up went on my to-do list.
Different methods
I looked at the toothpaste method and the baking soda methods. Both of these methods were a lot of work, I didn’t like that. I liked the method that had you use different grades of sandpaper to get the crud off the headlights. But it took a lot of time sanding for each grade of sandpaper to get the headlights clear. I’m one of those that like an instant(or near-instant), no work type of fix.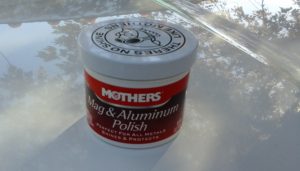
The winner
I kept looking, eventually, I found the method of using a wheel cleaner compound(Mother’s Mag and Aluminum cleaner) and a drill powered buffer to get the job done. One thing that caught my attention was that it didn’t take any time at all to clean the headlights. Here it was a cleaning method that was quick(less than 2 minutes per headlight). A method using a material that was less than five dollars(tugged at my wallet). A method that didn’t require any specialized tools.
I waited for a few days as I always like to conduct the job in my head going thru the process looking for possible points where there may be trouble with the process or materials. I thought about whether to purchase a buffing wheel, a new buffer(electric), where to get the polishing compound, and how best to protect my paint job and any other materials from the spinning buffing wheel. Here’s what I came up with.
Tools and materials needed
- Drill motor
- Buffing material
- Masking tape 1″ wide
- Rags for cleaning off any leftover residue
- Mother’s mag and aluminum cleaner
Protect the vehicle
I started the job by masking any part of the car that was next to each headlight. I had a leftover roll of blue masking tape that I pressed into service. Honestly, it took longer to mask off the car than the actual time it took to do the job.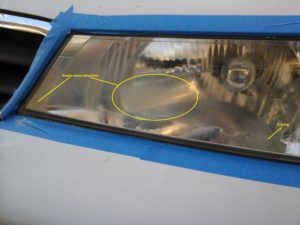
What tools do I use?
I watched the demonstration where he had used an orbiting buffing disk. Since I didn’t have one of those I needed to either buy one or buy a buffer. I don’t have much use for a buffer and I didn’t want to take a trip to the local tool store to purchase a buffing wheel and bonnets for my drill(the least costly option). But I did have a leftover(tapered buff bob) from buffing some brass. I liked that this unit was small and tapered. My headlights have some areas where they come to points. A buffing disk or bonnet would have some problems getting into those tight spots. The tapered buff bob would not have such problems.
How it worked out
I applied the buffing medium to the headlights with my finger. Then using the buffing tool attached to my drill I started in. The claim of it being quick was no exaggeration. I kept the buffing tool moving over the headlight. I must admit that it took several times(3) to get the drivers’ side lens clear across its entire surface. The headlight was clean and the lens clear again not bad for a fourteen-year-old lens. I used an old towel as a cleanup rag on the lens between coats. That way I could determine if I needed to apply a second coat on spots that I had missed or that needed additional attention. In less than two minutes per headlight, the job was completed.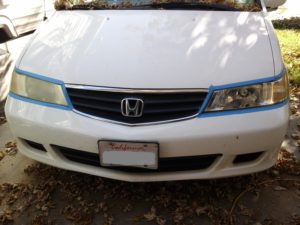
The final results
Crazing
Crazing is the phenomenon that produces a network of fine cracks on the surface of a material, for example in a glaze layer.
From Wikipedia, the free encyclopedia
I believe that if your headlights are as old as mine with no prior polishing that you will need to take several passes at them to get the entire lens clear just like I had too.
The final results of this system are that my lens are clear. I did notice that any crazing that the lens had, did not get removed. Considering that the lens are fourteen years old and not new it is not to be expected that crazing could be removed. What I wanted was a clear lens that got all the light onto the roadway. I also wanted a system that is super quick to execute. That is what I got.
I did not put another protective layer of clear over the lens. Knowing full well I expect the lens to return to their foggy state. I don’t know how long it will take but I fully intend to update this article when that happens.
Update June 2018
I noticed that the lens had a slight yellow tint to them in April. Considering that I had buffed them in early November I got six months out of the buffing before I could notice a change. But to tell you that I would immediately pull out the buffer and do it again would be not true. The yellowing is only slight, my bet is that I could go a full year and that it would not be bad enough to put it on the to do list.
Related Article: Headlight bulb Replacement
(Mybusyretiredlife.com All Rights Reserved)
(Mybusyretiredlife.com All Rights Reserved)
(Mybusyretiredlife.com All Rights Reserved)
(Mybusyretiredlife.com All Rights Reserved)
(Mybusyretiredlife.com All Rights Reserved)
Liked This Post? You May Like These:
