Green Cheap Raised Garden Beds
You can build green cheap raised garden beds. You can call this a green project because most of the lumber used on this project will be recycled and it’s on the cheap because its available for free. Your only expenses will be the nails, staples, screws and the 2″x2″ lumber.
Also if you want you can add some plastic-wood(all plastic materials are optional) for the tops of the boxes to prevent splinters later on. You will need to do some work to get the used lumber ready for use(disassemble the panels, pull old nails and sort good from bad lumber plus cutting to final dimensions).
 Garden Boxes Placed in The Garden Area
The Dream
Raised garden beds have always been a dream that’s been just beyond my fingertips. With raised beds, I could continue gardening for much longer with less bending. It would give the plants a jump start with additional warmth and greater room for root growth in a custom soil mix. Benefits for me and my plants.
But it’s a lot of money to spend on boxes that will have water in contact with wood 24/7. Essentially you are creating an environment that is hostile to wood. Investing money in the garden boxes only to watch them rot away is not a good idea. So I kept putting it off, but it was always in the back of mind how to do it on the cheap.
Definition of a Garden Box
Since I haven’t done it yet, I think I need to clarify my definition of a box for this article. A box referred to in this article has 4 sides with no bottom or top.
Criteria For Project Design
- I wanted to do it on the cheap, that was my first criteria. Free wood would help me keep it on the cheap.
- The boxes need to be strong. When filled with dirt/planting mix there’s a lot of pressure against the box sides.
- There is also that problem of water contact with the wood 24/7 so any design I came up with had to keep that in mind.
- The height of the boxes would be the same as any dining room chairs, around 17″. This would make it comfortable for me to sit down if needed(on the box edge) while working.
- When working around the boxes I don’t want to be pulling splinters out of my hands. A top layer of plastic wood will take care of this problem.
- The boxes had to be easy to move to another location if needed.
Materials used for this project
First thing I need to clarify is that the materials used on this project are all natural redwood(no stained or painted pieces). Since redwood is resistant to rot from the water it should last much longer than other wood materials. Also, there were no chemical-laced pressure treated wood products used on this project. Since these boxes were going to hold vegetable plants I don’t need anything like that in close proximity to things I’m going to eat.
Found Material and The Design
My job as a driver for adults with disabilities had me covering a lot of the city/county streets daily. I would notice piles of wood at the curb during my driving. These usually turned out to be pieces of fencing that had rotted out and needed replacing. These piles of old fencing got me to thinking and an idea slowly came to life.
Plastics
All plastic materials mentioned in this article should be considered optional and are used to extend the service life of the garden boxes.
Horizontal placement
Horizontally placed wood would be the quickest way to build the box. Five feet lengths of board at a time was tempting but the placement in that direction made me think that flexing(bowing out of the box when filled) was going to be a problem with all the wood running in the same direction. Also, any split boards or boards with large knots would not be usable. Also all fence boards are not the same width so trying to match up boards in the horizontal direction to get the same height was going to be harder to achieve but not impossible.
Vertical placement
So vertical placement started looking pretty good. The strength would definitely be in the vertical direction. I could cut out areas containing large knots and nail damaged wood, essentially keeping the best of the discarded wood. Any boards that are split(as long as the split pieces were wide enough) can still be reused. Board width was still a problem but manageable. I could dry fit the cut fence board pieces and get two sections that were close to the same size in length. Then all I would need to do is rip one fence board so that the final dimension of that longer section matched the other box section length.
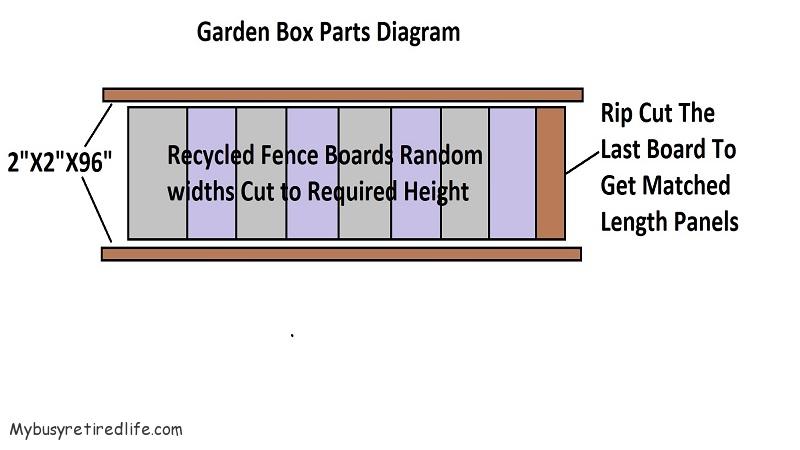 Garden Box Fence board Details
The new wood
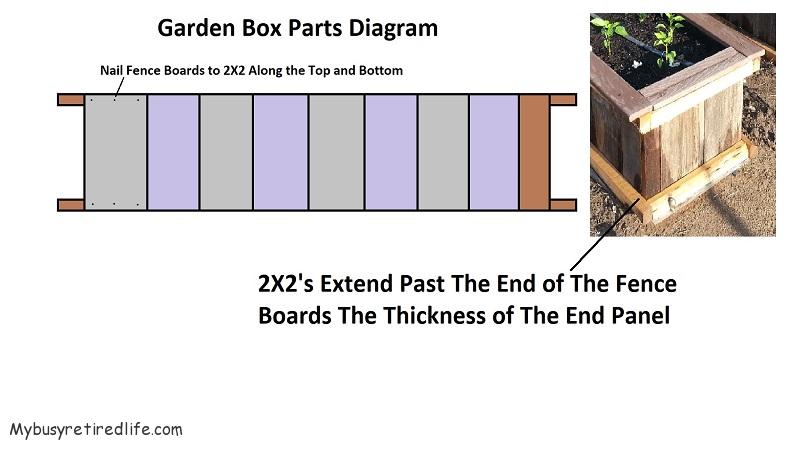
The rails are the only new wood used on this project. Each box would need an upper and a lower rail. So the design is the vertical placement of the recycled fence boards with a new upper and lower rail. This was going to be like building a fence.
 Garden Box End Panel Details
Where Can I Get Materials
I tried using the local craigslist and found it was not for me. It was to slow in that not many people were listing “old fence come get it” ads. There had to be a better way and there was. It came to me as I was driving. I noticed in one neighborhood that a really good looking fence was being taken down in 8ft sections and loaded onto a truck. Fence contractors, I wondered what they were going to do with those fence sections. It turns out that they were taking them to a yard that ground them up.
My proposal
I called and talked to a fence contractor and pitched my proposal.
“I need some fence boards. Let me know where your job site is and I’ll show up with my truck before you start working. Instead of loading them on your truck, load them on mine, you won’t have to unload them.”
The fence contractor was really helpful he even suggested I let him know which panels(eight-foot sections of a fence equals a panel) I would want to take, this is so great I get to “cherry pick” the panels. I have found my source for the fence boards. Now I have to buy rails to hold the fence boards together.
Working with the contractor
How you work with the contractor is really important. You want to be at the job site before his crew gets there. You do not want to be giving orders or directions to his crew. All orders or directions need to come from the contractor. Ask the contractor where they want your truck to be placed so it is easier for them to load it. This way you will keep up the goodwill between you and them should you need to come back and get more panels later on. The thing is to not make any more work for the contractor. They will appreciate it and you will build goodwill should you need it. In case your wondering, I had to get panels from the contractor three separate times. So I needed all the goodwill I could get.
The rails
A simple freehand drawing of the layout on scratch paper with dimensions is all that is needed to remind you of what you are trying to accomplish.
 Garden Box 2X2 Details
Taking Everything In
I measured the yard. Using my hoe I scratched out my box shapes on the ground to help me visualize the layout. I determined the optimum space between boxes, and the distance the boxes would be from the fence and other yard structures. What this exercise gave me was the number of boxes I would need to make and all the physical dimensions of each box except for height. I dragged out my old high school drafting ruler and drew up a plan. It should be noted if you intend to do this type of project that you don’t need a drafting ruler to draw up a plan.

Staedtler 12-Inches Architect Triangular Scale
How much do I need
My plan gave me all the information I needed. How many stringers to purchase and how many board feet of recycled fence boards are needed. My next decision now that I have the box dimensions is how am I going to put the sides and ends together?
Nails, Screws or Brackets and Bolts?
Am I going to nail them together? Do I add brackets and bolt everything together? Should I put a post into each corner and nail or screw it together? I didn’t like the idea of putting a post in each corner as that would take up valuable real estate room in the planting area and there’s the water contact on the wood issue. Adding brackets and bolting would add additional cost to the project. Using nails to hold something together would only work for a short period of time before they will put apart, not a viable option. So it looks like screws will do. One screw at each place the two rails came together. 8 screws per garden box. All I needed now was how high I needed to make the beds.
Chairs
I counted on being able to sit if needed while tending the garden. So my garden boxes needed a comfortable sitting height. So I measured the chairs around the house and choose my dining chair height as to how tall the boxes would be.
Adding water resistance
I added water resistance to the boxes by wrapping the individual pieces of each box in garden black plastic. Two layers to be exact. The plastic on the end panels was cut to the edge of the panel. On the side panels, the plastic extended past the end of the panel by at least 6″ on both ends. When the boxes were assembled the plastic wraps around the corner(along the inside) and overlap the end panel plastic. I stapled the plastic to the rails using 1/2″ staples. This makes it harder for the water to get into the corner joint.
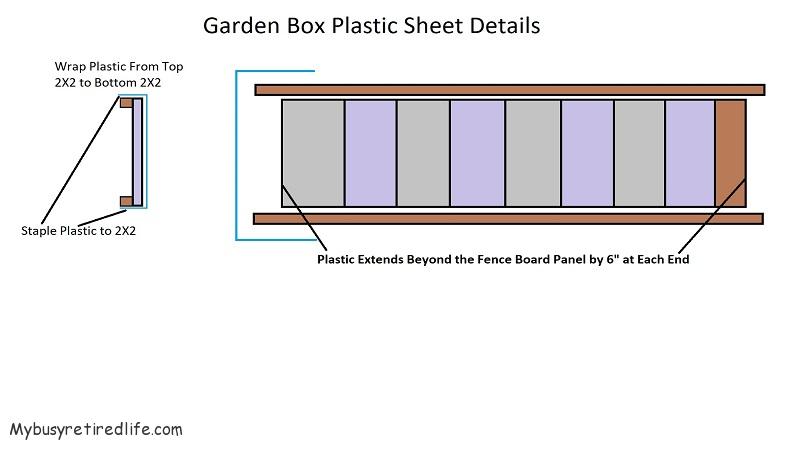 Garden Box Plastic Details
Making it hard for water to get to the vertical pieces
The plastic starts out stapled to the bottom of the bottom rail. It wraps over the fence boards and is stapled to the top of the top rail. I stapled it only at the rails. There are no staples in the fence boards. This method does not allow water to come in contact with the fence boards. This method allows the lower rail to rest on plastic when it is on the ground and not have dirt contact. The upper rail is covered by more of the fence boards or by the splinter eliminating material.
How many cut boards will you need?
If your going to build some boxes here’s a handy calculator that will tell you how many cut boards you will need for one box. Just enter 12″(to determine pieces needed not actual board footage) for the height and the width of your boards and how long your box will be(total all four sides in inches)it will tell you how many cut boards you will need to have to get your box made. Calculator
Related Articles: More garden articles
(Mybusyretiredlife.com All Rights Reserved)
(Mybusyretiredlife.com All Rights Reserved)
(Mybusyretiredlife.com All Rights Reserved)
(Mybusyretiredlife.com All Rights Reserved)
(Mybusyretiredlife.com All Rights Reserved)
(Mybusyretiredlife.com All Rights Reserved)
Liked This Post? You May Like These:
