Scribing flooring
Scribing flooring is the one job that is always needed when you’re installing your own laminate, wood, or vinyl planking. It is usually needed on the first and the final row of the project. You may also need to scribe for floor registers or any walls in the middle of your project room or hallway. Scribing is not that hard to do. You don’t need special tools, or skills to scribe the wall.
 Running bond pattern
Running bond pattern or random pattern
You won’t need special tools but you will need information to complete the task. This information is about the pattern that is used to install the floor.
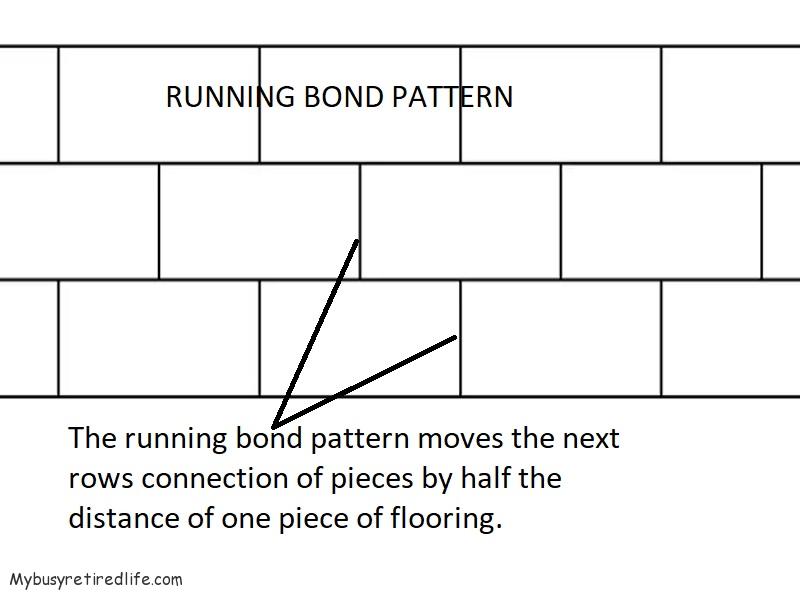
The Running bond
There are two patterns used to lay down the floor, running bond or random pattern. Running bond patterns can be in half or thirds of the width of a plank. A running bond pattern is established by the first piece of planking in the first row. Let’s say you will divide the length of planking into thirds for your running bond pattern. You install the first piece in the first row with the one-third length cut piece and then the second row starts with a two-thirds length and row three starts with a full-length plank. Then you repeat this pattern row after row.
This pattern will give you the strongest floor because the seams/joints will be seperated by consistent lengths. However this type of pattern can generate more waste than the random pattern.
Random pattern
If you use a random pattern you use the cut leftover piece from the previous row as the first piece in the next row. This method reduces waste and develops a pattern on your floor that changes as you lay down each row. How much the pattern changes from row to row depends on the room’s length and the flooring materials length. However, the distance between seams/joints from row to row must be watched carefully that it does not get to close.
Why is it important
Whichever pattern you use you want to keep your pattern consistent across the entire floor. If you start with a running bond pattern don’t change it to a random pattern halfway into the room. The change in patterns will be quite noticeable. It is especially important to keep the pattern consistent at scribe points(more on this below).
Also, if you’re using a random pattern check your flooring manufacturer’s recommendations on how close the seams/joints can be to each other from row to row. If you get these seams/joints to close they weaken the floors ability to stay connected and the seams/joints could come apart and open up over time.
Whichever pattern you use when scribing a wall pay close attention to your pattern to keep from breaking it.
Related Article: How to layout a floor
Scribe the wall
Scribing is used when you’re installing flooring against an uneven wall. Let’s face it, walls are rarely straight or true. Scribing easily transfers the contour of a wall to the row of flooring. When you’re done, the floor and wall will match perfectly. Scribing not only hides wall imperfections, but it also ensures that floating floors have the correct gap to allow the flooring to expand with temperature changes.
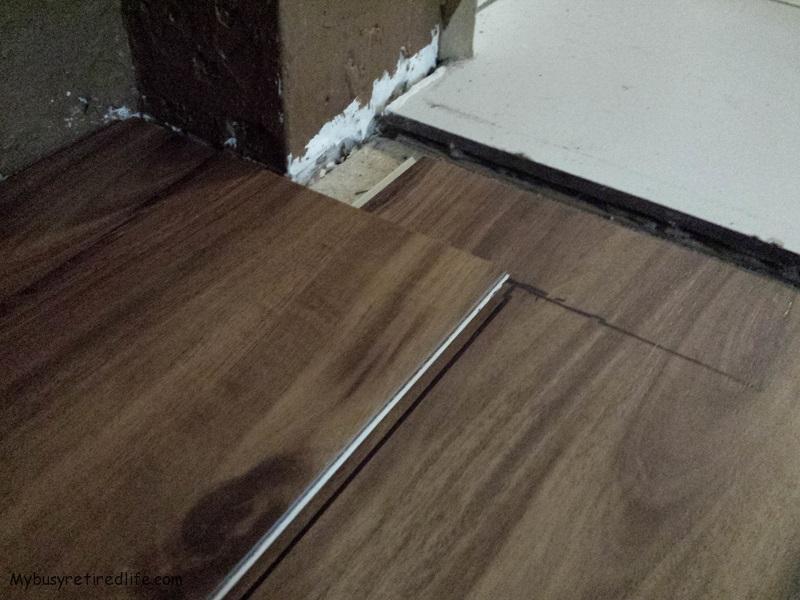
Never scribe just one row(wall in the middle of the job)
This is something that I had to do for my last floor. The “room” I was working on is an entryway and has a hallway attached(see below). I started my floor at the front door wall and laid it down for the entryway. Then the floor continued along a hallway to the right. That meant that there was a wall in the middle of my floor job that had to be scribed. If I tried to use just the one row of flooring it was to loose. All the joints were firmly locked but over the long length of the hallway(greater than twenty feet the end of the scribe row could be moved more than six inches toward the wall or away from the wall.
In this case, it is best to attach one or two more rows to the row to be scribed. This will stiffen the row against bowing/bending when scribing a long wall. If you try to use only the first row for scribing it may have a gentle curve in it due to the flexibility of the material’s locking seams/joints. If I had scribed the one row this could resulted in wasted material and having to do the work over because of the seams/joints movement. Adding another row or two to the scribe row before scribing stiffened the row and limited this kind of movement but did not eliminate it.
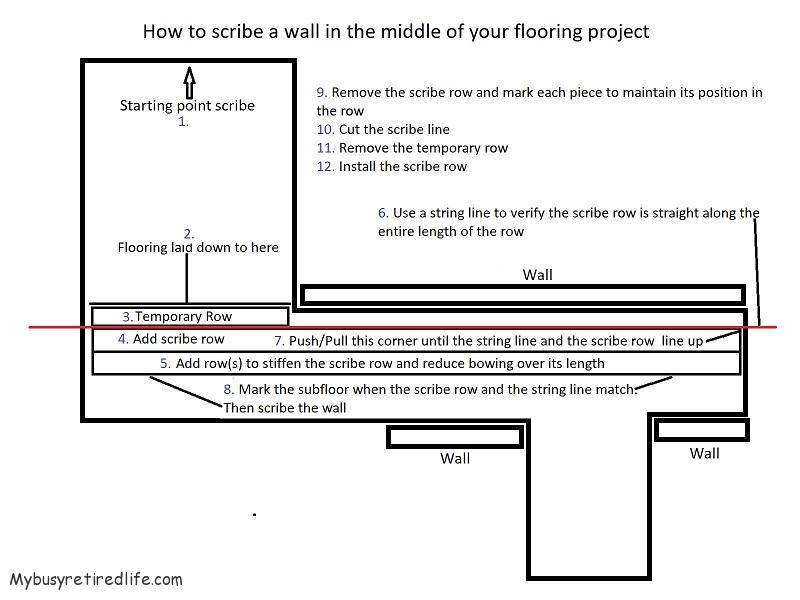 Scribing a middle wall
Still bowed after adding rows? How about a string line?
After adding the additional rows you can use a string line to verify that the scribe row is straight. I placed the string line(mason line) at the corner of the scribe row attached to flooring. At the other end of the row, I pulled the string taut and placed it at the matching place on the row. If the string and the scribe row don’t line up along its entire length move the end of the row until the row lines up with the string along its entire length. Mark the subfloor along the edge of the row. This mark on the subfloor will help you verify that the row is still straight and properly lined up while you scribe the row.
Tools needed for scribing
- Pencil or marker
- A short piece of the flooring(8-10″ long, this will become your scribing tool).
- A pull bar to help install the last row after it is cut.
- Hammer or mallet.
How to make your scribing tool
- Make the tool from the short piece of flooring.
- The final measurement of the tool will be the face width(the part you see when it is installed) and part of the tongue to equal approximately 1/4″(this extra material will be the air or expansion gap between the wall and the flooring material).
- Check your flooring material documentation for the recommended gaps.
- Cut off any material from the tongue to get the proper gap distance.
Scribing the last row
To scribe the last row to the wall you need the last two rows of flooring already cut to fit but not installed. The reason you cut the two rows of flooring but do not install them is because of the pattern(this procedure is the same for either running bond or random). You are going to skip installing the next to the last row for now. Instead, you will install the last row in its place for scribing. When finished scribing, remove the scribe row for cutting. After that, you will install the uninstalled(second to the last row) row to maintain your pattern. Then install the scribed and now cut last row to complete your job.
Recap
- You will install the last row(scribe row) one row too early. You will not install the second to last row until later.
- Then you will scribe the wall onto the last row.
- Now remove this final/last row and cut it along the scribed line. Make sure to mark the pieces of this row so that they go back into final position in the same order that they were when scribed.
- Install the second to last row.
- Then install the last scribed and cut row.
How to scribe
This is the easiest part of this whole procedure.
- Lay the “tool” on the last row of planking and butt it firmly against the wall.
- Using the Pencil/marker draw a line along its length.
- Slide the tool along the wall stopping so the line will overlap slightly.
- Draw a line along its length.
- Repeat for the entire row length.
- Make sure to number your planks so that they go back(after cutting) in the correct order.
Conclusion
That’s it, your done scribing your flooring. You know about floor patterns and how they affect your scribes. You should be able to scribe any wall in the middle and the last row of your project. Also if you want to know how to determine the width of the first row(so you’re not scribing a 1/2″ row) read how to layout a floor.
The last row is installed(a pull bar will make short work of this task) and the baseboard or quarter round is the only thing that needs to be installed.
Related Article: Installing Baseboard to Perfection
(Mybusyretiredlife.com All Rights Reserved)
(Mybusyretiredlife.com All Rights Reserved)
(Mybusyretiredlife.com All Rights Reserved)
(Mybusyretiredlife.com All Rights Reserved)
(Mybusyretiredlife.com All Rights Reserved)
