Three DIY air conditioner maintenance tips
Three DIY air conditioner maintenance tips for better cooling. These are three DIY things that I consider easy to do items. These can be accomplished with very little skills and a little caution. I was looking ahead at my cooling for the summer. My wallet was looking at saving an ac service cost. You may consider these tips a DIY ac tune up.
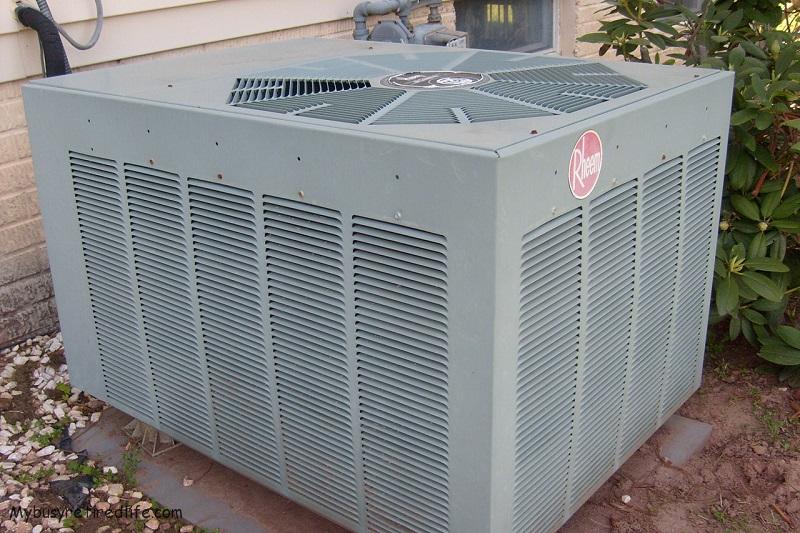 Air conditioner condenser coil
The three things are:
- Clean the condenser coils
- Change the filters
- Inspect and insulate the suction cooling pipe
Skill set needed to clean the condenser coils.
Cleaning the condenser coils is the one task that will require the most skills. You will need to know how to disconnect power(circuit breaker or disconnect located near the condenser) from the air conditioning system. You will need to know how to apply a soapy mixture and how to spray water. Those are the skills required. You can clean the condenser coil with one of two methods.
Why cleaning the condenser coils is necessary
The air moves from the outside to the inside of the condenser. A fan located above the coil pulls air through the coils. As the air moves thru the coil it removes heat from the freon as it passes thru the coil. The air is carrying dirt, leaves, and bugs that can buildup and eventually block the flow of air(not good) thru these coils. Yearly maintenance makes sure that the coils remain free of debris and dirt buildup. Using dish soap and water removes this buildup. Which method you use is up to you and how confident you feel about your DIY skill.
Safety first
Safety is required when working on your air conditioner. It may not be running but that doesn’t mean that it can’t start up on its own. Every air conditioner with a condenser outside and an evaporator inside the house has a physical circuit breaker near the condenser. You will need to pull the circuit breaker before you start to clean the coil. This task is required no matter which method of cleaning you choose.
Condenser coil cleaning method #1
This method requires the least amount of skill. You will be cleaning the coil from the outside. You will knock down the buildup(with water) from the outside. It will be getting the material wet and heavy so that it can fall off the unit when more water is sprayed on it. Always spray in at an angle so that the material is encouraged to fall away and not be driven into the coil.
You will not need to remove the fan. No special brushes are needed. You will not need special cleaners(I used a mixture of liquid dish soap and water from the dollar store). You will allow the dish soap and water mixture time to do its cleaning then you will squirt the soap off the coil until there is no longer any soap suds and hopefully the coil will be clean. If not you will repeat the process again.
The following video shows how to clean the coil with water from the outside. I recommend that you follow up the water only cleaning with dish soap (25%) and water bath to help reduce any dirt/dust build up in the coil. I used an old dish soap bottle to mix and apply the soap mixture. If the coil is easily visible, as in this video it makes cleaning from the outside very practical.
Cautions
- Under no circumstance will you try to drive the buildup material thru the fins. If you try to do this it may plug up the coil and you will have a big problem on your hands.
- Do not allow anything to contact the coil fins(water is OK) as these fins will bend very easily and you will be blocking the movement of air thru the coil.
- Do not try to shift the unit in any direction. You could cause the unit to put pressure on sensitive components inside the unit which may crack(again you’d have a very big problem).
Condenser coil cleaning method #2
This method requires a small amount of skill. You will be cleaning the coil from the inside. If your unit has the coil covered(no removal panels) like the photo above(my coil is similar) this is the best method for a clean coil. I like this method because you are driving out any dirt or particles back out the direction they came in. This method also has you open up the unit by “removing the fan”. You will not be disconnecting(removing the fan’s wires) the fan will remain connected. But it will be relocated(supported) while you clean the coil. You will not need to remove anything else.
However, if your unit has individual louvered panels covering the coil and you can remove them easily I’d recommend removing them. Also, you will need a shop vacuum to clean out any accumulated debris from inside the coil floor(clean only the floor). My unit had an inch thick layer of leaves from nearby trees. This task is accomplished with no vacuum contact of the coils.
Once the unit is vacuumed out spray water from the inside to the outside. The first time to soak any accumulated dirt on the outside of the coil. Again this task is accomplished with no sprayer contact of the coils. After soaking the larger particles of debris on the coil then it is time to spray the coil with a dish soap and water mixture. Allow 5-30 minutes of soak time for the dish soap to dislodge any dust/dirt particles. Rinse with water until there are no longer any suds coming off the rinse water.
Replace rotting insulation
Replacing missing insulation on your outdoor A/C will help your unit’s energy efficiency. This fix is simple. You need a length of pipe foam with the adhesive already on the cut edges.
Why you need insulation on the suction pipe
The refrigerant temperature inside the suction line is generally cooler than the surrounding air. Therefore, it is always good practice to insulate the entire suction line to prevent condensation and loss of capacity due to heat gain. Without insulation, moisture may condense on the outside surface of the pipe and drip onto the floor or suspended ceiling below. Also, any heat gained by the suction line places an additional load on the system that reduces cooling capacity, and also may result in improper motor cooling with some compressor designs.
Shopping for pipe foam
Measure the large A/C line diameter. Next, you need to know whether you want rubber or polyethylene foam. Both have their advantages. Rubber foam will last longer than polyethylene foam. Polyethylene will not shrink as much as rubber foam. My unit had rubber foam originally installed so I replaced it with the same stuff.
Condensation
Install the foam when there is no condensation on the tubing. Condensation on your outdoor A/C lines reduces efficiency and raises energy costs. Start by peeling off the old foam. Measure the outside diameter on the larger of the two tubes. Cut the new insulation to length. If you are using rubber insulation add a 1/2″ to the length for shrinkage.
Yearly maintenance of pipe foam
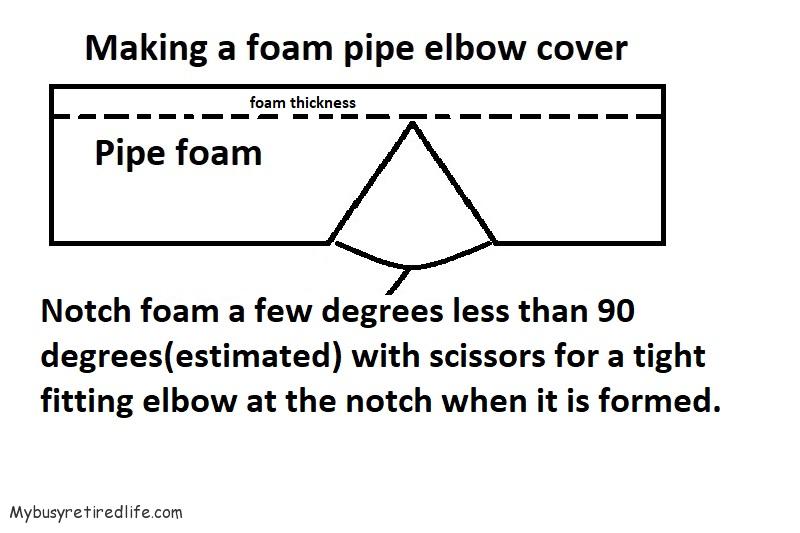
How to create an elbow with pipe insulation.
Use scissors(for best results) cut out a 90º notch at the place where the foam will turn direction. Leave the foam attached at the back of the notch.
New foam installation
 DIY foam elbow
Take the time to check the insulation throughout the year and it will help you save money and energy.
- Slip the new foam over the tubing.
- Lock the end of the tube in place with a zip tie.
- Remove the adhesive liner, align the edges and press the seam together as you go. Once the glued ends touch, you won’t get them apart again.
- Use a zip tie to secure the other end of the foam tube.
Making a foam elbow
- Use scissors for the best cut.
- Cut the foam so that it remains connected at the back end of the pipe elbow.
- Cut the foam so that the cut is less than 90º so that the two cut edges will press tightly against each other when the pipe is wrapped around the elbow.
Change Air Conditioner Filter
This is the simplest most neglected maintenance step in my home. I need to get reminders for this step(more on this later).
Replacing the filters is pretty simple in my home. My homes system has the return ducts(with filter) in the ceiling. The cool air comes out of floor registers. So a couple of 1/4 turn thumbscrews at the return ducts and the old filter is out and the new one in place.
Have you looked at the number of options in filters? It can become daunting wading thru all the filter options to get the right filter in place. I had been considering going to a pleated filter. At least that’s what I thought I needed. This was until I heard the argument for filter replacement with the old super cheap filters. It made so much sense that there was no argument that could be used against it.
The A/C system was made up to use the cheap filters. You know the kind, a little bit of fiberglass filter media. Nothing else no pleated, no electrostatic, no hospital grade, no odor eliminator. Using any other kind of filter restricts air flow thru the system. Restricted air flow results in a loss of efficiency. Loss of efficiency is your money wasted.
That’s it change out your filter(s) with standard filters. Also while you are changing those filters be sure to vacuum those return duct covers for each filter.
Reminder maintenance apps
If you’re like me and you find you’ve extended your air conditioner filters to long maybe one of these apps may help you stay on track. Here are some home maintenance reminder apps.
House Maintenance Schedule Lite
That’s the three DIY air conditioner maintenance tips. Apply in the spring and enjoy cooling all summer long.
Related Article: Box Fan Weak Air Flow
(Mybusyretiredlife.com All Rights Reserved)
Liked This Post? You May Like These:
