Installing baseboard to perfection
Installing baseboard is all about the splices, corners, and nailing into the wall studs.
The techniques applied to these three areas will ensure that your job looks top rate. Also during contraction/expansion cycles the splices and corner cuts will not appear to change should they open up. You will need some tools to get the best results.
Tools needed
Hand Nailing Tip:
Snip off the head of a nail and use it as an improvised drill bit for best results.
To get the best results for splices and corners you will need a power miter saw and a finish air nailer. You need the miter saw for accurate cuts and the air nailer is needed to drive the nails in quickly so the two pieces of the molding do not move during the nailing process. Yes, you could use a hammer and finish nails but you will need to predrill all nail holes. If you’re going this route use a thin piece of wood(hole drilled thru it) to protect your baseboard from hammer blows during the nailing process. A paint stir stick will work nicely. A nail set will drive the last bit of exposed nail below the surface.
Safety First
A miter saw is loud, spewing sawdust everywhere, and potentially dangerous to your person for every cut. Be sure to keep your hands well away from the blade. I do a practice cut(without power) to see where my fingers are in relation to where the blade will be for every cut. I also wear hearing protection and safety glasses when using it.
Splices
Most of the time the room dimensions will require splices in the baseboard. Now you could just butt joint at the splice but this would be a mistake. The splice would open up during a contraction period(normally cold weather) and your eye would catch that gap very easily. So how do you splice? You use a technique called a scarf joint.
Scarf joint
A scarf joint (also known as a scarph joint) is a method of joining two members end to end in woodworking or metalworking. The scarf joint is used when the material being joined is not available in the length required. It is an alternative to other joints such as the butt joint and the splice joint and is often favored over these in joinery because it yields a barely visible glue line.
From Wikipedia, the free encyclopedia https://en.wikipedia.org/wiki/Scarf_joint
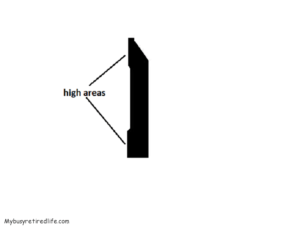
Miter Saw Fence height
A scarf joint is pretty simple to make. Use of a miter saw makes this cut very easy. Simply set the saw to a 45º and make your cut vertically. One caution on this type of a cut. Be sure the miter saw fence is high enough to support the baseboard on both of its back-side high-areas during the cut. If the fence falls short the cut will have a bad angle which will show up when you try to align the splice.
If your fence is too short here is a video on how to make and attach a sacrificial fence for your miter saw.
Hold the baseboard against the fence and the saw base during the cut.
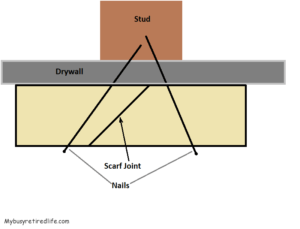
Before you cut you need to have all splices occur on a wall stud. This way you can nail both sides of the joint into the stud for stability(see graphic below). To avoid splitting do not nail thru the scarf joint. Apply wood glue to the joint to ensure that your two pieces of baseboard become one solid piece. After nailing wipe away any excess glue.
Corners
Corners are a little more complex. But the techniques in cutting a 45º on a miter saw still apply. This time for a corner there is only one 45º cut and the other side is a butt cut. The reason for this arrangement is that there is no such thing as a square corner. Putting two forty-five degree pieces into a corner that is 92 degrees leaves a gap somewhere. Also, contraction of the pieces during cold weather will produce a gap. So what cut is used for corners?
Coping
Coping or scribing is the woodworking technique of shaping the end of a moulding or frame component to neatly fit the contours of an abutting member.
From Wikipedia, the free encyclopedia https://en.wikipedia.org/wiki/Coping_(joinery)
 or CC-BY-SA-3.0 (//creativecommons.org/licenses/by-sa/3.0/)], via Wikimedia Commons")
It’s called a cope cut. One side of the corner butts into the corner. Cut the other side at 45º. Using a coping saw with a fine blade to cut the contour away so that the piece fits against the butted piece.
How to get the best results from a cope cut
How to get the best results of the coping cut. When cutting the profile, angle the coping saw blade to remove the material behind the cut. This ensures that there will be no high spots when trying to butt the two pieces together.
Also, do not cut on the cut edge but away from it(about 1/16″). I used to cut along the edge as many others show on their videos. But I found that cutting on the edge will sometimes result in the saw’s blade crossing that line resulting in gaps between the two baseboard pieces. I found that if you cut away from the edge about a 1/16″ leaves very little material that can be removed easily with a fine tooth file. Using a file to remove this material gives you better control than the saw blade. You get a crisper cut line and a much better-finished product.

Use a fine tooth flat file to remove that last bit of material to the cut edge and control the appearance of the cut. Use a fine-toothed half round file for removing material from the curved parts.
The butt-ended side
Now the other side of this corner is the butt-ended piece. This piece also needs work. Remember that there are no 90-degree corners? Well, those same corners are also not a crisp cut corner. So butting a piece into a corner will sometimes result in a gap from the wall to the butt end of your baseboard. This piece needs to have the back side of the corner removed or rounded. Removing material from the corner’s backside accommodates the deformity of the walls. A wood rasp will work well at removing this material.
Corner Fitting Trick
If the drywall tapers in at the bottom of the wall or stops short of the floor, just install a screw at the bottom of the wall and turn it in until the head of the screw is at the same level as the rest of the wall. The head of the screw will prevent the baseboard from tipping in.
So with the butt-ended piece corner rounded, it should produce a better fit in the corner. The coped cut piece then goes up against it.
Nailing into the studs
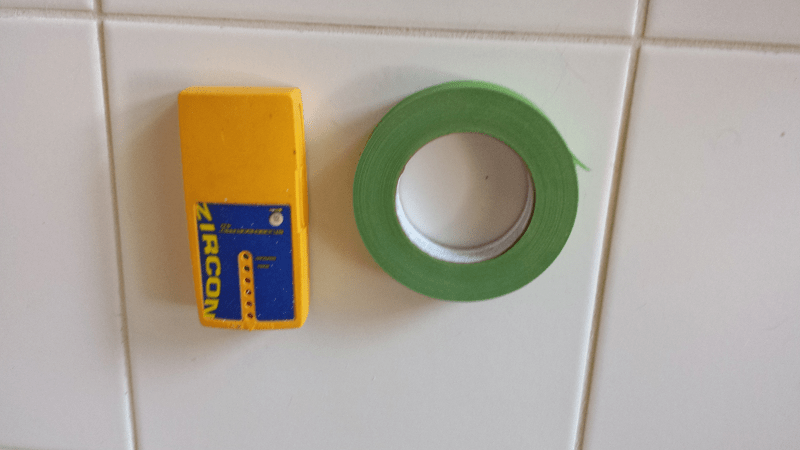
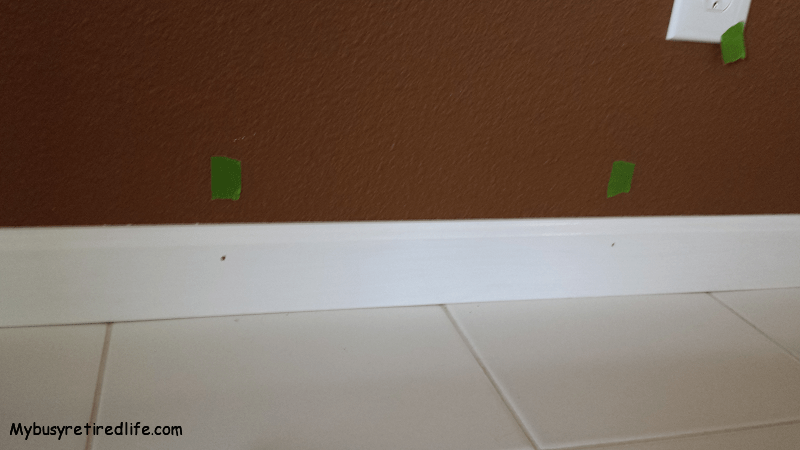
Nailing into the wall studs will require a stud finder tool. You will also need some 1″ wide masking tape that can release without pulling the paint off the walls. This can also be accomplished without the stud finder tool but your ear will need to be fine-tuned to the sound of a stud behind the drywall. I use the stud finder to find the stud and then mark it with some 1″ masking tape. I go along the wall find all the studs and mark their location. Then it’s pretty simple to go along and nail the baseboard to the wall. I don’t worry about the lower nail location because that part of the wall has the bottom plate stud along the entire wall. When that wall has the baseboard installed I move the tape pieces to the next wall sticking them to the outlet cover until needed.


Outside corners
Outside corners. There is no way to do this without mitering them. But remember those not 90 degree inside corners well the same goes for outside corners. The following video explains how to handle outside corners. She discusses less than and more than 90 degrees corners. Spoiler alert you will need to use some basic math to get perfect corners.
You can check your outside corners by doing as she did in the video. Cut two short pieces with the 45 degree angles then you place them on the outside corner and see what the situation is. If you have a gap you will need a protractor to determine your correct corner angles. Not interested in buying a protractor? The following video shows you how to get the angle without a protractor.
Related Article: Installing Door Casing to Perfection
(Mybusyretiredlife.com All Rights Reserved)
(Mybusyretiredlife.com All Rights Reserved)
(Mybusyretiredlife.com All Rights Reserved)
(Mybusyretiredlife.com All Rights Reserved)
(Mybusyretiredlife.com All Rights Reserved)
(Mybusyretiredlife.com All Rights Reserved)
(Mybusyretiredlife.com All Rights Reserved)
Liked This Post? You May Like These:
