DIY Plastic Welding
I needed tips on DIY plastic welding. Welding plastic was in my future. I needed a wet saw for a future project and the saw that came up had a crack in the water pan. The seller was very straight forward and listed it as a flaw in the advertisement so I was prewarned. When I arrived at the sellers place the crack turned out to be in the worst place you can have a crack. It was in the corner. It went from the top of the pan to the bottom of the pan with a couple of spur cracks branching off the main crack. I bought the wet saw.
 DIY welding plastic water pan with a soldering iron and zip ties
Previous experience
I already knew about plastic welding due to a previous weld needed on a sand filter body. No, I didn’t perform that weld. I entrusted it to a professional at the pool supply store. That weld held up for a few years before the tank developed another crack. The original weld never failed.
Thoughts on how to fix that crack
I now had a wet saw that needed its water pan welded. My original thoughts were that if the crack was in the middle of the pan I could pop rivet some aluminum over the crack. A little roofing cement could keep the water from leaking out. It would be like patching a leaking gutter. The corner crack completely killed that idea. I visited youtube.com and found a few videos where they were using a low wattage soldering iron to perform the weld. Hmmm, I have a soldering iron, I may not need to buy a special tool. Maybe DIY plastic welding is for me.
Filler material
I knew that with conventional welding practices there is a rod or wire used that helps fill in the material between the two pieces being welded. I considered that the plastic welding process would have such a material. So I did a search and there they were, filler rods for different plastics. My wet saw water pan is old and I don’t know what kind of plastic it is made from.
Caution rant box coming out
I looked at those videos and looked and listened for any tips on the techniques of welding. Sometimes there are videos that show you the technique you’re looking for but if you listen closely the host is giving out tips on the process whether he or she calls them out as such. Most of the time the person is rambling on about the process and suddenly there it is a tip in cloaking mode. They hand them out without even knowing that they have passed on a gem of knowledge. Ok, ok, I’m putting the rant box away.
No special tools or filler material
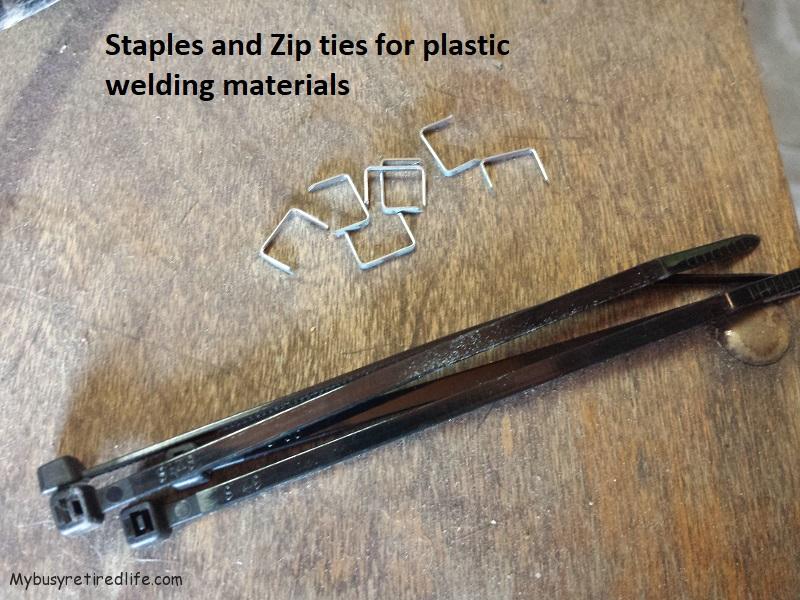
I don’t have to buy a special tool for this job. I already own a small soldering iron. Also, I won’t have to buy a special plastic welding rod. I found a video where they used zip ties as the welding rod material. Also, they reinforced the weld with paper staples they had flattened and buried in the plastic below the weld. I like these ideas. Materials I already have on hand. Also, my wallet is very happy, no new tools and no other materials that need to be bought and stored. DIY plastic welding is for me!
Tips on plastic welding
I found the following tips called out or rambled out. I also added a few of my own observations.
- Clean the area to be welded with alcohol.
- Work in a well-ventilated area(outdoors is best).
- Set up a fan to suck or blow the fumes away from you or wear a proper respirator with cartridges rated for vapor protection.
- Wear safety glasses or a full face shield and gloves to protect your eyes and prevent burns to your hands.
- Warm the plastic, it makes it easier to melt and add filler plastic.
- Tack weld the plastic to hold the crack together.
- The deeper you melt into the plastic the stronger the weld will be when finished.
- The learning technique using a soldering iron is short but there is still a learning curve.
- Reinforce your weld with wire or paper staples to increase the strength of the weld.
- Don’t expect it to look like brand new.
Clean the weld area
What’s important here is that you want the piece to be welded to be clean of any foreign materials. If it’s not plastic it needs to be removed or cleaned away. I used some high strength alcohol(90% alcohol) to clean the area. The previous owner had tried an epoxy fix that had failed so I had to chip and pick it away until it was gone. I could have used soap and water as long as I gave it enough time to completely dry. But high strength alcohol evaporates in seconds.
Safety
The next three steps are all about safety. The first thing is to pick your spot for welding in an outdoor location. You want plenty of fresh air. The fumes generated by this DIY plastic welding process are not good for you. So don’t do this in the house or garage.
Next set up a fan so that it will suck or blow the fumes or vapor away from you while you work. Having the fumes sucked away is probably the best approach as then the air will not be trying to cool down your work. If you don’t have a fan, wearing a respirator with vapor rated cartridges is always a good option.
Wear safety glasses to protect your eyes. Since your working with a hot tool and your heating plastic until it is soft and flowable the use of gloves to prevent burns to your fingers or hands is highly encouraged.
Warm the plastic
Warming the plastic helps the plastic to become more malleable. This starting warmth makes the adding of additional material(plastic welding rod or plastic material) much easier. A heat gun or hair blower will help your plastic to warm up quickly but don’t overdo it. You don’t want the piece to be welded to get so warm it warps out of shape.
Tack Weld
A tack weld is something that is done to hold the two pieces in place and establishes their mutual location to each other. It also ensures their alignment while you complete the main weld. This part of the technique works especially well for a crack. The two pieces can be squeezed together(verify that everything is aligned perfectly before applying heat) while you apply the soldering iron to the edge of the crack until it starts to melt. Remove the soldering iron and continue to hold the pieces together until the plastic becomes solid again(15-30 seconds). Now the two pieces are held together by the “tack weld”. No need for clamps, straps, or devices to hold the two pieces together while you finish the main weld.
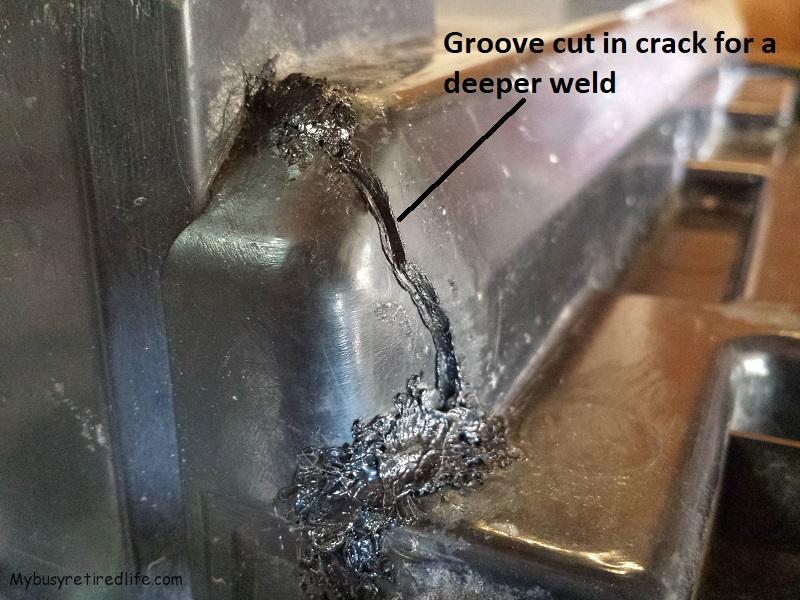
Deeper melt
This part of the technique ensures that you are really joining the two pieces together and not only at the surface. I found this to be especially easy to do with the soldering iron. The soldering iron has a pointed tip and the end of that pointed tip can be used very easily to melt a groove along the crack. I used the tip of the soldering iron to melt a groove about halfway through the thickness of the material I was working on. This part of the process is what I would call a “tack weld”. It firmly held the two pieces together until I could get the crack filled. Then I “welded” additional plastic material to fill the groove and a little more. Then I flipped the piece over and repeated the process to the other side of the crack. So the weld material was actually all the way through the plastic water pan when the weld was completed.


Learning curve
The learning curve for plastic welding is very short but it is still there. If your worried that you are going to “mess it up” find some piece to practice on. The learning curve is going to be about how long to keep the soldering iron on the plastic so that you don’t punch a hole in the material. The curve is also about how to melt the welding rod and get it to stick to the workpiece as you continue along the weld. The last part of the curve is going to be about how to pretty up the actual weld. The weld can look pretty rough after you are finished. It will be about applying the soldering iron tip to smooth out the look of the weld.
Reinforce your weld
Reinforce your weld if the part is used under a load or experiences a lot of vibration. I found a video that suggested you use staples(the kind that holds papers together) to reinforce the weld. I think that if your workpiece is flat this is a good technique. But if your working on a curved object or location then the stiffness of the staple becomes a problem. You will need a different technique.
A better technique is to use a single wire from a really small stranded wire(insulation material removed) for reinforcing the weld. The stranded wire is very flexible and can easily lay down around a curve. Lay the wire on the material and apply the tip of the soldering iron to the wire until you see it moving down into the plastic material. Then add additional material over the wire and allow it to cool so that it holds onto the wire firmly. Then repeat the process along the wire until you have crossed over the crack. Snip the wire and repeat the process until the entire wire is embedded and covered in additional material. Repeat as many times as you feel the piece needs reinforcement. I used 5 reinforcements(it’s going to hold about 5 gallons of water) along my 3″ crack.
The final look of the welded piece
Don’t expect the welded piece to look like a new piece. It’s not going to be smooth and non-bumpy. Your adding additional material and that melted plastic wants to stick to the soldering iron tip and it will pull up as you remove the soldering iron so set your expectations to a lower level than perfect appearance. Don’t get me wrong I still expected my reinforced weld to be able to hold water and stand up to the vibrations of the saw. It did both but it isn’t exactly smooth or pretty.
Since I wrote this article I have been welding more and more plastic pieces around the house. I think the soldering iron is the best tool for creating a groove in a crack and deep weld filling short cracks(inches long). It is also the best tool for tack welding along the crack. But if you’re trying to fill a crack longer than a few inches it is to slow for me. I have found that there is a better tool for filling a long crack very easily and more important quickly.
Related Article: Buying a Used Tile Saw
Weld Plastic using Household Plastics
(Mybusyretiredlife.com All Rights Reserved)
(Mybusyretiredlife.com All Rights Reserved)
(Mybusyretiredlife.com All Rights Reserved)
(Mybusyretiredlife.com All Rights Reserved)
(Mybusyretiredlife.com All Rights Reserved)
(Mybusyretiredlife.com All Rights Reserved)
Liked This Post? You May Like These:

I think doing plastic welding would be interesting and useful. At least it patches up the leaks. But is there any way to smooth the surface for aesthetic reason? Thanks by the way.
Hello Muhaimin,
Thank you for your comment. It brings up an interesting aspect of any welding process. From my experiences at different styles(arc, gas) of welding the first welds are always ugly. The more you weld(as you develop your technique) the better looking that they will get.
I must admit that I hadn’t considered making them look better. I was concentrating on restoring functionality. But I will try several techniques in the future to see if I can smooth them out. But be forewarned that most repairs will never return the object to an original appearance.
Thanks again for the comment.
RayC