How to Setup a Used Wet Saw
How to setup a used wet saw is critical knowledge to getting the best performance of your used or “new to you” saw. What your going to do is verify that the blade and table have the correct angle relationships(yes, more than one) to each other. With any used saw purchase you should consider all angles of the saw blade and table relationship to be suspect until you have verified that they are correct. There are adjustments built into the saw that will get the blade and table to achieve the correct relationships and to work properly.
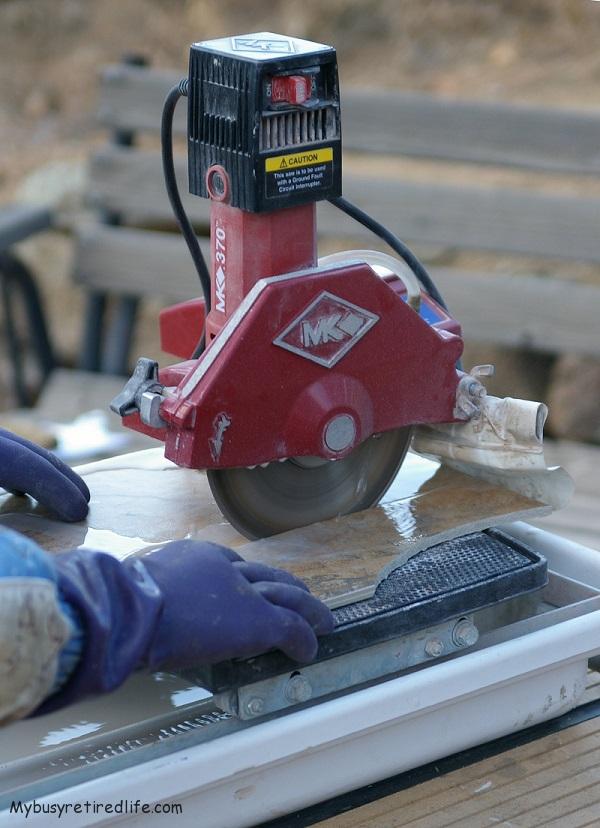
Tile Saw
My own “new to me” tile/wet saw must have been handled extremely rough as the blade and table were definitely not setup. The worst part of the setup is that the blade was no longer centered in the cutting groove and would try to cut the table if I turned it on.
Tools needed for this procedure
Tools required to set up a used wet saw will vary because of all the different manufacturers. But you can be sure that you will need a square. Maybe even a couple of squares. A small square will be best for the vertical part of the setup. A larger combination or framing square with it’s longer blade will also work best for the horizontal part of the setup. Hand tools like a combination wrenches or a small adjustable wrench, possibly hex keys or Allen wrenches, may be needed for other parts of the setup.
Safety
Since you will be working with an electric power tool safety is the highest priority. Unplug the electrical cord for the saw. You will also be working with water so after cleaning give your saw motor or electrical components enough time to dry out before you plug the cord in again. While you are unplugging the cord inspect the pigtail and the strain relief from the saw and pump for cuts and heavy abrasion. Inspect all the connections for fraying or poor conditions of the electrical connectors.
Clean it up? Why?
The first thing to do is to clean up the entire saw. That means clean the saw and frame(include the table). The water pan and water pump also need cleaning. If included clean the stand. The cleaning process involves a mixture of dish soap and water in a bucket with assorted brushes and rags to get into the nooks and crannies.
Why are you cleaning the saw? The cleaning process will allow you to accomplish three things at the same time. The cleaning process will introduce you to all the adjustments and where they are located on your “new to you” saw. It also lets you closely inspect the mechanical condition of the saw as you clean. Also you can also start making a mental list of the tools you might need for any needed adjustments.
Water Pan and Water Pump
Most tile/wet saw water pans today are made from plastic and are susceptible to cracking. Inspect the water pan for cracks. I don’t know about you but I don’t like the thought of standing in a puddle of water while I have my hands on a powered-up electric tool. If you find cracks you can easily weld them before they cause a problem in the middle of your project. See link below for welding plastic with a simple tool and common materials. Also, inspect the intake section of the water pump for debris buildup. It will need to be cleaned so as not to starve the pump and allow the cutting blade to overheat during your project.
Table surface, roller/wheels
Most sliding table type wet/tile saws use a set of linear bearings that ride a guide rod on one side of the table. Clean the guide rod of any built-up dirt. Clean any buildup of debris at the bearing blocks. Lubricate the guide rod and bearings with a silicone lubricant or lube your manufacturer recommends.
The other side of the table usually has a set of rollers that roll along a flat surface of the wet/tile saw’s frame. First, verify the condition of the table rollers. They should be clean of debris buildup, round with no flat spots, and freely able to spin or rotate, all the rollers should be making contact with the frame. Clean any buildup from the rollers. Replace any rollers that have flat spots. Free up frozen rollers. Lubricate the roller bearings/bushings with a silicone spray lubricant or lube your manufacturer recommends. Clean the matching roller contact surface on the frame of any dirt/debris buildup.
Clean the tabletop surface. My tile/wet saw table surface had a large buildup of dried grout or mastic. This type of material buildup would not let any tile lay flat as it was being cut. While I was cleaning the tabletop I noticed that the grooves for water removal were also filled with a lot of the same material. I cleaned out all the grooves as well.
The tile/wet saw should now be clean enough so that any measurements that are taken will not be affected by any dirt/debris buildup.
Blade to table
Before attempting any measurements verify that the blade is not warped and seated properly. Place a piece of tile parallel to the blade(so you can see the gap easily). Then with saw unplugged, hand-turn the blade and look at the gap between the blade and the tile. The gap should remain constant as you turn the blade.
There are four things that you need to check to verify that the blade and table are properly set up to each other.
- The blade is 90 degrees vertically to the table surface.
- The saw’s blade is running in the center of the table groove.
- Table fence and the saw blade are horizontally square to each other.
- That the blade extends a little past the surface of the table(cutting depth adjustment).
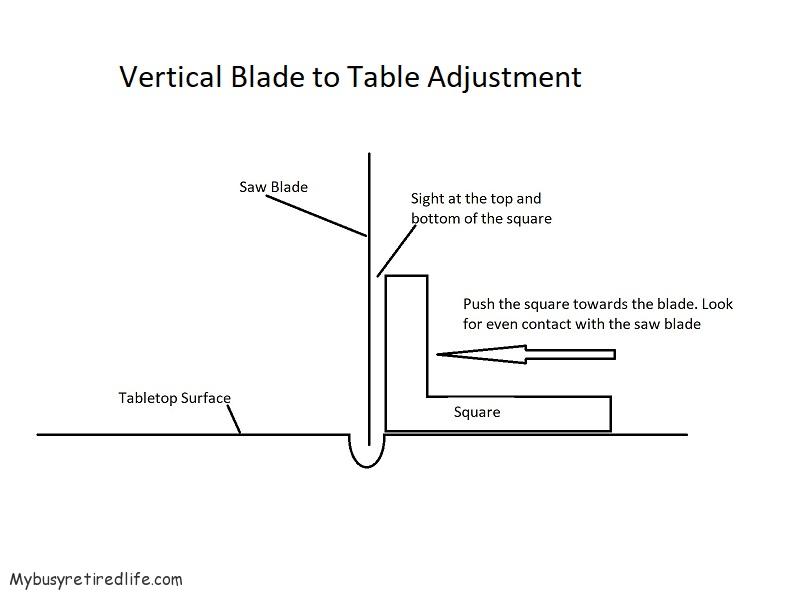
Vertical blade to table adjustment
The blade must be vertical(90º) to the table during its operation. Some saws have the blade move to accommodate a 45º cut. So this adjustment needs to be checked after moving the blade. If you have this type of tile saw you should locate the locking mechanism for the motor/blade movement and loosen it(could be bolts or knobs) and move the blade to practice adjusting the blade angle.
If your tile/wet saw design does not let the blade change angles then look at the table rollers. They may be height adjustable. See the photo above and you can see the adjustment slot at each of the table rollers.
Remove any blade cover(if needed). Use a square placed on a clean tabletop and gently pushed to the blade to verify that the two pieces are square to each other. Sight between the square and the blade edge as you push the square to the blade. The two pieces should be parallel to each other with the top and bottom of the square touching the blade at the same time as you push the square to the blade. See illustration below.
Adjust the angle by changing the angle of the blade(if it can move) or by raising or lowering the table.
 Vertical setup blade to table
Center the blade
The blade runs in a groove in the table. In normal operation the blade needs to clear the table and not rub or cut it as the table is pushed past the blade. If the saw has been roughly handled and “knocked around” this adjustment may be needed. This will be a visual check.
Lower the blade so that it is in the groove of the table. Sight along the table and verify that the blade clears the table as you push the entire length of the table towards the blade. If the table does not clear the blade the table will need to be adjusted. There may be a slot on the side of the table where the guide rod attaches to the frame. If there is a slot this is where the adjustment is in centering the table. Some manufacturers adjust the table independent of the guide rod. If the table can not be moved sideways towards or away from the blade look for an adjustment that moves the blade sideways in either direction.
Table fence square to the blade
This adjustment makes sure that the tile will not be crabbing into the cutting blade. If you want to see what crabbing looks like, this is a twenty-second video of a vehicle crabbing as it is driven. Imagine your blade is the road and the table with the tile you’re trying to cut is the vehicle.
Lower the blade into the groove as much as possible without rubbing the table. Move the table so that it is under the cutting blade. Place a square against the table fence and lay it on the table. Slowly move the square towards the cutting blade. The blade of the square should contact the leading and trailing edges of the cutting blade at the same time. If it doesn’t make even contact you will need to adjust the table using the adjustments you used for centering the blade to the table. For this adjustment move one end of the table or guide rod at a time to square the table to the cutting blade. See illustration below.
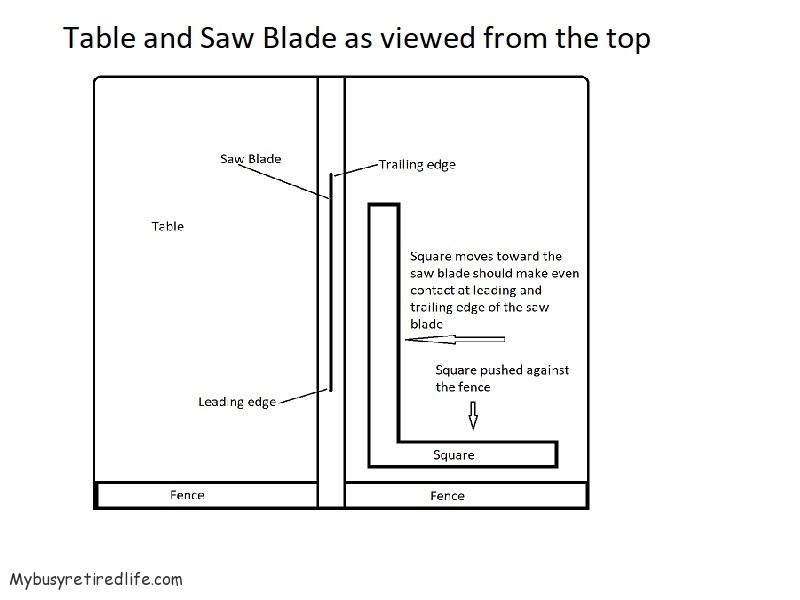 Table fence square to the blade
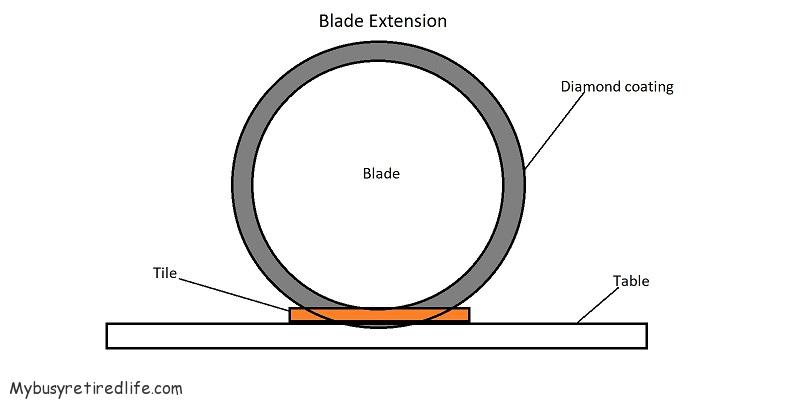
Blade extension
This is the easiest adjustment and saved for last. Adjust the height of the blade so that it extends slightly below the surface of the table. About a 1/8 of an inch or 4-5mm if you use the metric system should be enough. However, you don’t want the blade to be too far below the table surface. If it is too far below the surface of the table the surface area of the blade that does the cutting is reduced and cutting efficiency is affected. If it is not deep enough below the table surface the tile might not get cut all the way through.
 Blade extension below the table
Conclusion
That’s it you have finished your last adjustment. Install a new blade on the wet/tile saw. If the blade has an arrow marked on it make sure that the arrow is moving in the right direction when you turn on the saw. All that’s left to do is to test your work. Grab an old tile and begin cutting.
Related Articles:
Buying a Used Wet Saw
Welding a wet/tile saw water pan
(Hustvedt [CC BY-SA 3.0 (https://creativecommons.org/licenses/by-sa/3.0)])
(Hustvedt [CC BY-SA 3.0 (https://creativecommons.org/licenses/by-sa/3.0)])
(Mybusyretiredlife.com All Rights Reserved)
(Mybusyretiredlife.com All Rights Reserved)
(Mybusyretiredlife.com All Rights Reserved)
Liked This Post? You May Like These:
