Rebuilding a Vac Mate
Rebuilding a Vac Mate is something I did recently. I have owned three of these over the last fifteen-twenty years. They do a great job of making a suction pool cleaner work to it’s fullest potential. They skim floating debris continuously helping to keep the pool clean. But they do have their weakness. It is something that you can easily notice if you look. Is the pool skimmer not pulling in the water like it should? The pool skimmer not working or no suction in the pool skimmer like it really should. The weakness is that they develop cracks in the base of the unit and eventually break apart just in front of the skimming part of the unit.

What is skimming?
In order for the skimmer to be working well the water needs to go over the weir. This speeds up the flow and aids in drawing floating debris into the skimmer. This is the skimmer function. When the cracks appear and widen enough the water bypasses the weir and the debris floats past the skimmer.
Replace or Repair?
Well, it finally came to the point that the current unit broke apart in the usual place. I am faced with the usual question Do I replace the unit or buy the replacement parts?
Now I have always replaced the unit but this time I thought Why don’t I just replace the part and see if it is worth it?
The top housing assembly
A quick check found the part(called top housing assembly) I needed at half the cost of an entire unit and free shipping. I found myself with two units in need of the same part. I thought I have the time available, why not?
So I ordered the part for one unit. I thought I could hold the other unit in reserve as a parts warehouse should the need arise.
Not so fast
Replacing the top housing assembly is not so straightforward. The unit requires disassembly of the top plate and the skimming body parts. The weir and control shaft assembly can then be installed. That is the only tricky part of this installation. On the plus side while you are disassembling these parts you can inspect them for flaws which may require replacing these parts later on.


Tools you will need for this job
So here is the disassembly and installation of Vac Mate.
Step by step rebuilding a vac mate(disassembly of the old unit).
- On the old unit remove the skimmer basket. This is where the loose parts will be held until needed.
- Remove the basket shaft and retaining nut.
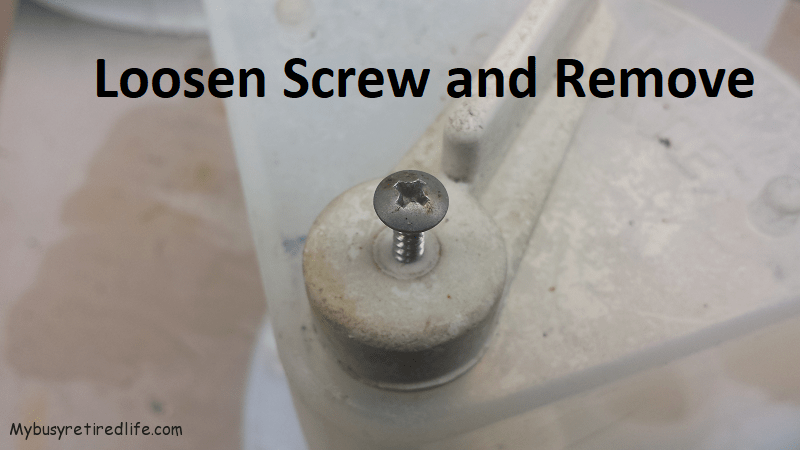
- Remove the screw holding the control handle onto the control shaft.
- Pull the control handle and remove the thrust washer from underneath it.
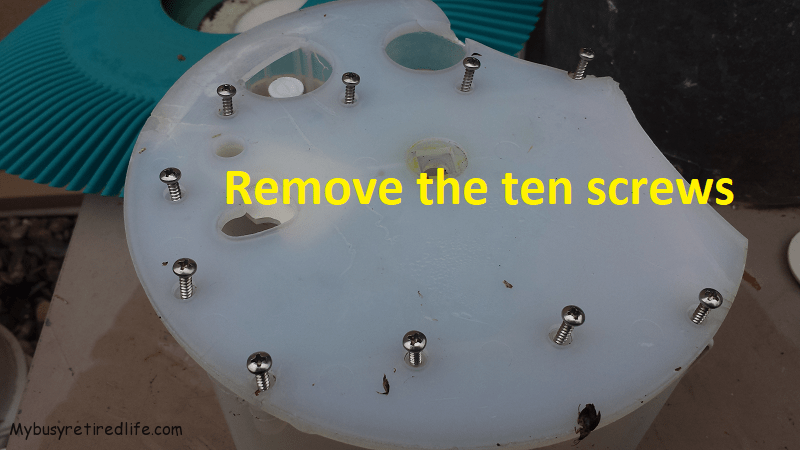
- Turn the unit upside down and remove the ten stainless steel screws that hold the top housing together.
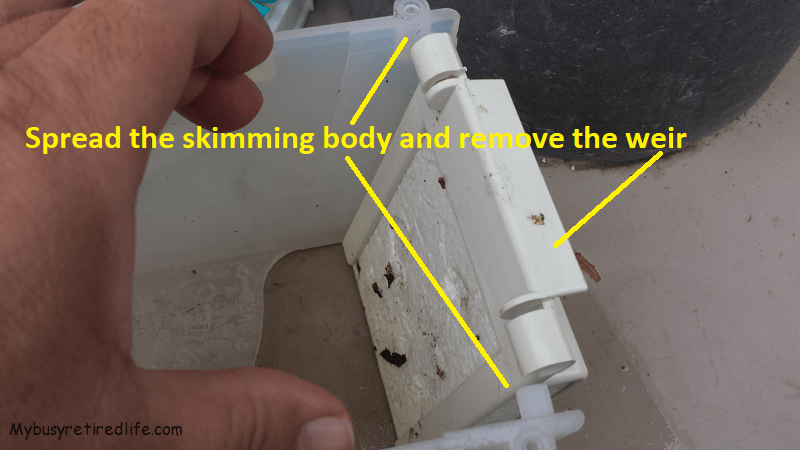
- Separate the skimming body and the top housing plate.
- Spread the skimming body slightly apart. Remove the weir.
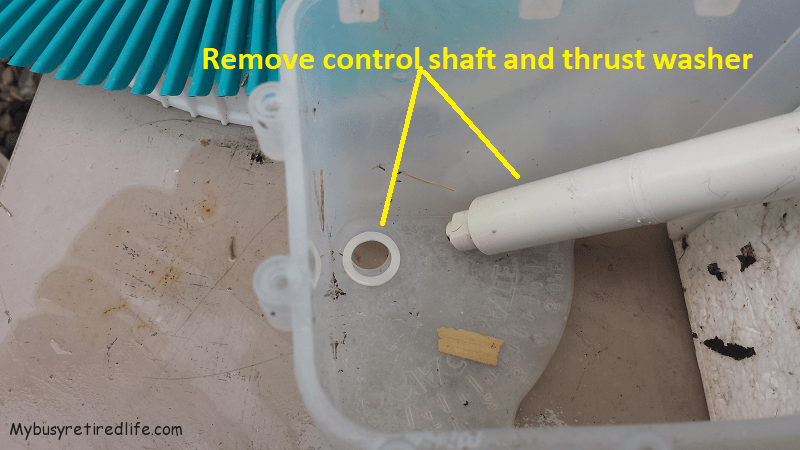
- Grasp the control shaft and carefully remove it. Pay close attention to the thrust washer that is between the control shaft and the skimming body.
Now you will need to take apart the bypass valve. This valve keeps the vacuum drawn on the unit constant by opening when the water drawn thru the unit reaches certain levels. I don’t have the original vacuum gauge that was used to set this up so I came up with this part of the procedure. If you still have your vacuum gauge refer to your manual on how to set up the bypass valve.


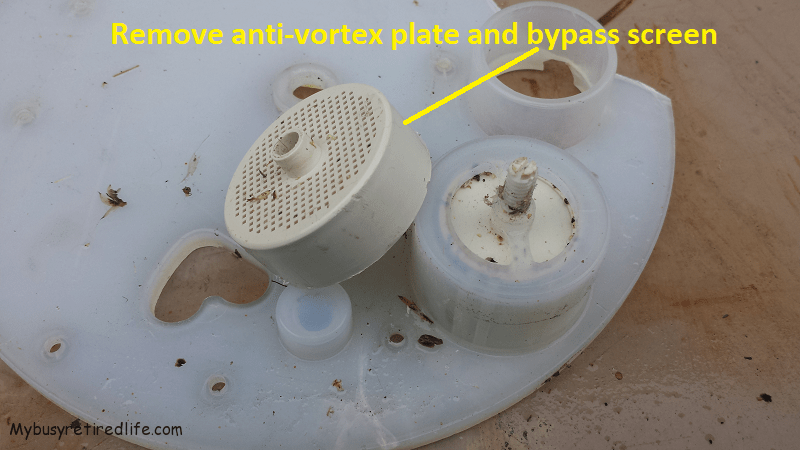
- Remove the anti-vortex plate(pull up on the edges, it is held in place by friction).
- Carefully remove the bypass screen(again this part is held in place by friction).
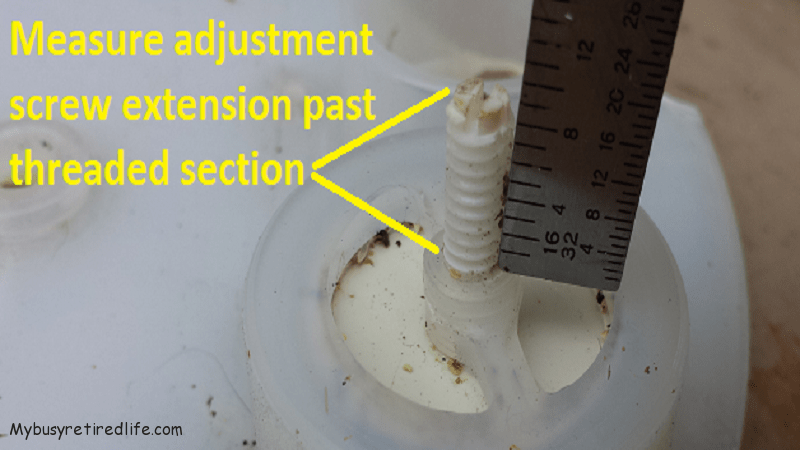
- Measure the distance(in the smallest increments possible) the adjustment screw is sticking out of the threaded section(see photo) and write it down for later.
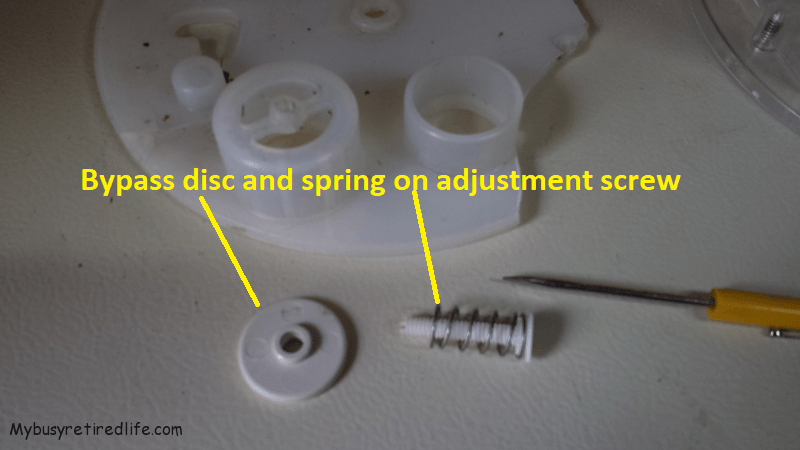
- Slowly back out the adjustment screw. If it gets stuck(its been in place a long time) do not force it. Gently reverse the screw(tightening, loosening, tightening, loosening) until the screw comes out without a lot of resistance.
- Make sure the bypass spring and bypass disc do not fall off the adjustment screw as you remove it.
Reassembly
- Remove the ten screws on the new top housing assembly.
- Separate the skimming body and the top housing plate.
- Install the control shaft, thrust washers, and control handle on the skimming body.
- Install the screw on the control handle and tighten.
- Slightly spread the skimming body and install the weir.
- Assemble the adjustment screw, spring, and bypass disc and install on the top housing plate
- Adjust the adjustment screw to the measurement you took on the old unit.
- Install the bypass screen and anti-vortex plate.
- Assemble the skimming body and top housing plate.
- Verify that the control shaft is covering the opening on the top housing plate when set to zero on the skimming body.
- Tighten the ten screws.
- Install the basket shaft and skimmer basket.
Weekly pool maintenance
Weekly maintenance on the Vac-mate should include:
- Emptying the skimmer basket
- Cleaning the bypass screen
- Inspection of the top housing assembly for cracks
Refer to your Pentair rainbow vac-mate manual for any setup questions.
Conclusion
I believe that rebuilding a Vac-mate is cost effective if you do not have to replace any more parts than the top housing assembly. It probably would be to your advantage to disassemble the unit beforehand to inspect the parts for their condition. If all the parts are in good shape except for the top housing assembly then order the part.
Related Articles: More pool articles
(Mybusyretiredlife.com All Rights Reserved)
(Mybusyretiredlife.com All Rights Reserved)
(Mybusyretiredlife.com All Rights Reserved)
(Mybusyretiredlife.com All Rights Reserved)
(Mybusyretiredlife.com All Rights Reserved)
(Mybusyretiredlife.com All Rights Reserved)
(Mybusyretiredlife.com All Rights Reserved)
(Mybusyretiredlife.com All Rights Reserved)
(Mybusyretiredlife.com All Rights Reserved)
(Mybusyretiredlife.com All Rights Reserved)
(Mybusyretiredlife.com All Rights Reserved)
(Mybusyretiredlife.com All Rights Reserved)
Liked This Post? You May Like These:
