Installing Door Casing to Perfection(Continued) Page 3
Cutting the vertical casing
The first casing to be cut is the one on the left in the photos below. But for your case, it needs to be the non-hinge side of the door. You want to see perfection on the non-hinge side where you will be standing when you open the door. If there are any imperfections they will be furthest away at the hinge side of the door opening and harder to notice.
- Stand the left casing on the floor.
- Transfer the corner mark on the jam to the inside edge of the casing.

Transfering corner mark to left side casing
- Go to the miter saw and cut an appropriate 45 degree off the top of the casing but not at the mark.
- Measure from the cut to the mark.
Measuring from the cut to the mark
- Transfer the dimension to the back of the casing(do this step when doing several casings at a time)
- At the bottom of the casing measure from the bottom up(the dimension from step #4) and mark the casing for cutting.
- Cut the bottom of the casing.
- Put the casing on the left side of the door jamb and check that the forty-five-degree cut is at the corner mark of the jamb. Adjust as necessary.
- Repeat this procedure for the right side casing.
- Starting from the bottom, nail the left side casing to the jamb along the inside edge, aligning it with your reveal marks. Near the header place two nails one inch apart to stabilize this part of the miter joint. Do not nail the outside edge at this point.


The No Nail Zone
The photo below shows what I call the no nail zone. I have found that sometimes when I have a tight miter joint and I drive a nail in this area into the wall that the joint may open up due to the wall being not level or flat. So I do not drive nails into the wall in this area. The area is defined as drawing a straight line horizontally and vertically from the miter joint to the wall(see the yellow box).
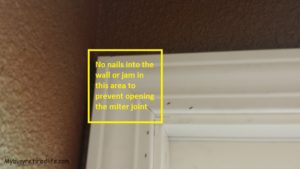
The no nail zone
The header
The next step is the top section(called a header) of the casing.
- Cut the matching forty-five-degree angle for the left side of the header casing.
- Place what will be the header casing against the left side casing.
- At the right side corner mark transfer the mark to the header casing. Get help if needed to hold the left side miter joint in place while transferring the mark.
- Go to the miter saw and cut it at the mark.
- Verify that the upper casing is the correct length adjust as necessary.
- Apply wood glue to both sides of the left side miter cuts.
- At the left side casing butt the header casing against the left side tightly. Do not worry if the upper casing is not following the marks on the jam at this point. What’s important is that the left side miter joint is tight at this point.
- Nail the inside edge with two nails an inch apart. Safety! Be aware of your hand and finger placement when nailing. Especially when nailing the miter joint.
- On the outside edge of the mitered joint drive, one nail from the top and one nail from the side thru both pieces of the door casing to keep the outside edges together and the miter joint tightly closed. If the wall is too close for nailing(see photo below) from the side drive two nails at different angles thru both casings(not into the wall) from the top. Clean off any excess glue. Do not finish nailing the header to the jam at this time.

The right side miter joint
The next step is about the right side casing and the miter joint.
- Nail the right side casing along the inside edge to the jamb from the bottom up aligning it with your reveal marks. Stop nailing about two feet from the miter joint.
- At this point, we are going to compensate for any minor error in length short or long for both the right side casing and the header casing. That’s the reason you didn’t nail all the way to the miter joint.
- Apply wood glue to the cut edges of the miter joint.
- Press and align the two casings together to form a tight miter joint. Don’t worry about the reveal marks for now.
- On the outside edge of the mitered joint drive, one nail from the top and one nail from the side thru both pieces of the miter joint to keep the outside edges together and the miter joint tightly closed.
- Push the miter joint against the jam and align as closely as possible to the reveal marks without opening the joint.
- Starting at the miter joint nail the inside edge of the casing to the jam with two nails an inch apart on each of the casings(start with the right side and then the upper casing).
- Finish nailing the inside edge of the casings to the jamb aligning as close as possible to the reveal marks.
- Drive nails on the outside edge of each casing to the to the wall. Be sure not to drive nails in the no nail zone of the miter joint.
- Clean off any excess glue residue.

Conclusion
That’s it you’ve just finished your first job at putting up door casing to perfection. You will need to caulk all your seams and miter joints. Also, fill any nail holes with spackle. But that is another article.
Related Article: Miter Joints and Other Techniques
Related Article: Installing Baseboard to Perfection
(Mybusyretiredlife.com All Rights Reserved)
(Mybusyretiredlife.com All Rights Reserved)
(Mybusyretiredlife.com All Rights Reserved)
(Mybusyretiredlife.com All Rights Reserved)
(Mybusyretiredlife.com All Rights Reserved)
(Mybusyretiredlife.com All Rights Reserved)
(Mybusyretiredlife.com All Rights Reserved)
(Mybusyretiredlife.com All Rights Reserved)
(Mybusyretiredlife.com All Rights Reserved)
(Mybusyretiredlife.com All Rights Reserved)
(Mybusyretiredlife.com All Rights Reserved)
Liked This Post? You May Like These:
