Pool Equipment Tune Up
It’s pool season again and time for a pool equipment tune up. I don’t want to experience problems all season long. So it would be a good thing to visit each piece of equipment and check out those things that can cause problems during the season.
Safety First
Before you start working on your system make sure that the power to the equipment has been disconnected at a breaker. Do not rely on a timer to keep you safe.
VacMate-Amazon.com
Skimmer, Weir, and Pump Basket Check
Well, I think that the smaller items would be a good place to start. So I start with the baskets. These baskets trap the larger particles/bugs/leaves before they get into the pump or filter. Look for obvious broken/missing pieces and any parts of the basket that are showing wear. I also look for cracks. The basket can look whole without a flaw, but be cracked so badly that the water’s movement can distort it out of shape. If I find wear but not an outright failure I will order a basket so that it is on hand should the basket break during the season.
While the pump basket is removed, drain the remaining water from the basket housing and use a mirror and flashlight to look into the inlet to the pump. This area should be free of debris or other such objects. Sometimes debris from stringy leaf plants can become lodged in this area and build up causing a flow restriction. This is especially true if the basket has experienced a failure and allowed larger particles to bypass it.
The weir plays an important part in the skimming action. It forces the top layer of water to be sucked into the skimmer. While the skimmer basket is out, check that the weir is working correctly if your system uses one.
After you have finished with this area refill the pump basket housing with water to help prime the pump before start up.
Related Post: Suction Pool Cleaner Skimmer Fix
Deep Clean The Sand Filter
I have a sand filter so it will need more than the usual backwash cleaning. Since this is the first of the season the sand will need to be deep cleaned. Cleaning the sand at the outer edge of the filter by breaking it up at least 4-6 inches deep and backwashing the buildup out of the sand. Then checking that the sand has been fully cleaned. If needed, doing the deep cleaning cycle again until all the sand is really clean and ready for another pool season.
With these two items completed the filtering system is ready for another season.
Related Post: Deep Cleaning a Sand Filter
Do you have a cartridge filter here’s a DIY filter cleaner that looks very effective?
Do you have a DE filter here’s a video on how to clean and backwash these type filters?
Pump, Valves and Water Lines
The next thing is to check out the water pumping system. This includes the pump and all piping and valves in the suction and return side. Start by checking the return side first. With the pump running look at the return jets. You should see the water returning to the pool without air bubbles. Air bubbles mixed in the water indicates that there is an air leak and the air is being sucked into the water stream by the pump.
Look at all the joints where a fitting is present in your water lines. The glue joints should look continuous without breaks in the glue. Look at the valve sections especially where a valve stem protrudes from the valve. This is the most likely place that an O-ring seal will break down and allow air to enter the system. Is water oozing from the stem? Are droplets of water forming around the stem? Look for anything like this as this is a good candidate for a leak. A few O-ring replacements will pay off over the pool season.
Related Post: My pool pump lost prime

Pentair WhisperFlo/IntelliFlo, Complete O-Ring Rebuild Kit at Amazon.com
Pump Seal Leakage Check
A part of this system that gets overlooked quite often is the pump seal. It is in a location that is hard to see but you can see a leak before you will ever see the seal. With the pump off look at the area of the pump and motor connection. Is the area around the pump dry? Unless it has been raining it should be dry. After a few hours of run time is this area still dry or is it now wet. Wet? Well if it is wet you have a pump seal that has reached its end of life cycle and it is time to replace the seal.
Related Post: Whisperflo pump seal replacement
Related Post: Whisperflo bearing replacement
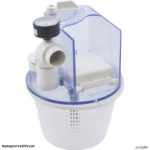
Check The Chlorinator Flow
I have a tablet chlorinator. If you have one of these units you need to verify that the inlet valve has not fouled and become blocked by debris. You can check this by following this procedure.
- With the pump turned off remove the cap from the chlorinator.(don’t breathe the fumes)
- Note where the water level is in the chlorinator.
- With the cap off the unit turn on the pump.
- Observe the water level of the chlorinator.(it should start to rise)
- If the water does not rise or rises very very slowly there is a problem(equals blockage) at the adjustment valve on the chlorinator or in the line going to the chlorinator.
- Try adjusting the chlorinator’s valve to increase the water flow to the chlorinator. The speed at which the water level rises should change with your adjustment.
- If you have a flow problem disassemble the valve and remove to verify that it(the valve) is in good shape and that the passages are clear and not blocked.
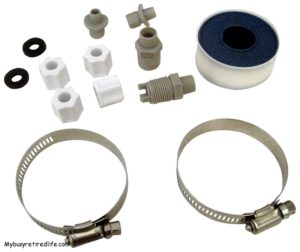
Offline Chlorine Feeder Parts at Amazon.com
The pool chlorinator parts that often need replacement are in the feeder parts kit. I always keep one of these kits available as the parts are too hard to find locally. With the chlorinator checked out you are assured that the pool will get the proper amount of chlorine(provided that you refill it in a timely manner).
Related Post: My Pool Chlorinator
Related Post: Troubleshooting the offline automatic chlorinator
Pool Cleaner Hose
I have a suction type pool cleaner. So keeping up with the condition of each hose section is an ongoing task. The easiest way to check the hose sections is to have the pool pump running. Setup the pool cleaner so the majority of the water is being drawn thru the cleaner. Now with the pool hose starting at the skimmer lift a hose section out of the water and shake it. You should not hear a pitch change when you do this. No pitch change is equal to the hose being in good shape with no leaks.
A pitch change indicates that there is an air leak. The hose has a hole worn thru it or it has cracked from age and chlorine contact. Repeat the process for each hose section until you reach the pool cleaner. The last section(closest to the cleaner) should have a pitch change because most likely the leak will be at the swivel end of the pool cleaner. If you are unsure about this last section have a new hose section to swap out if the same pitch change happens for both hoses it is the pool cleaner swivel that is leaking.
No leaks in the hose. Great, pull the hose from the pool and lay it on the deck. This following procedure will help to keep the hose from developing a memory which can cause problems with the hose staying in a constant loop or loops. Take each of the sections apart and let the hose lay on the deck to warm it up and help straighten out each section. Mix the hose sections up when reassembling the hose.
Pool Cleaner
While the hose is sunbathing on the deck examine the pool cleaner for worn parts. Some worn parts need immediate replacement others can be delayed until you get new parts. In my case, my pool cleaner’s pleated skirt is showing signs of wear and will definitely need replacing soon. So I have one on order and I am letting the worn one work until I can get a new skirt delivered to my home.
Related Post: My Kreepy Krauly inspection and rebuild
Liked This Post? You May Like These:
