WhisperFlo bearing replacement
Whisperflo bearing replacement is easy to do. It all started when my pump lost prime. It must have run about a week before I noticed that something was wrong. That means my pump was probably running dry for some time. A big no-no as far as pumps are concerned.
Anyway, after I fixed the air leak that caused the pump to loose prime I was hoping that the bearings had not taken a hit. Unfortunately, the seal became the next thing I had to replace and I should have replaced the bearings at the same time but it was hopeful thinking that maybe they would still be in good shape. It took a few weeks after the seal replacement before the sound became loud enough to elevate my concern level.
I have replaced the bearings on this pump before this. So this will not be my first time working on my pump motor. I had to order two bearings and replace them. These two videos below are very detailed and will guide you through the bearing replacement procedure.
Safety
Before working on the motor or pump make sure the power is turned off(disconnected) so that there will be no live power to the pump motor circuit.
Screenshot of electrical fitting on my pool motor
He did not mention how to disconnect the wiring in the video since he was working with a motor on a bench.
Remove the two screws that hold the cover plate in place. Then remove the cover plate and using your cell phone camera take a closeup photo of the wiring. Now when you go to put everything back together you have a copy to make sure that everything goes back in the right place.
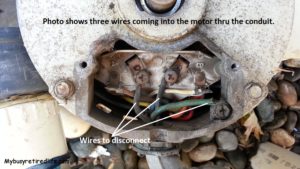
Photo of motor wiring
Once you have a good photo disconnect the wires from the terminal on the motor.
I have a watertight conduit that connects to the motor. So I loosen the compression side of the fitting and pull the loose wires out of the motor thru the conduit connector. I have an additional copper ground that also needs to be disconnected. After disconnecting the ground you can take the motor to a bench for working on the bearings.
There is no #3 video
In part two video he says that there will be another video but I could not find one and the comment section indicated that there was not a third video.
Bearing replacement procedure starting with the motor separated from the pump on a bench:
Video #1
- Remove the 4 thru bolts that hold the motor together.
- Place registration marks across the end bells and the main motor casing to make it easy to put back together.
- There are two places on the end bell that you can use to tap it off the motor shaft.
- Once the end bell has a gap use two screwdrivers to pry it away from the main motor casing.
- After the end bell is off the shaft, be careful not to lose the spacers(2)
- Clean the end bell
- Tap on the end bell flange to remove the shaft from the main motor casing.
Video #2
- Use a nut driver to loosen up the screw at the front of the bell.
- If you have a padded workbench you can drive the bearing out of the housing by tapping the shaft on the workbench. Or you can use a rubber mallet to drive the shaft out of the housing. Hold the housing and hit the end of the shaft with the rubber mallet.
- Clean the bell.
- Use a puller to remove the bearing from the shaft.
- Clean the shaft surface.
- Lightly lubricate the shaft before installing the bearing.
- Slip the new bearing onto the shaft and use a tool(1/2″ pipe nipple) small enough so that it makes contact with the inner race of the bearing only.
- Replace with a 203 bearing(drive onto the shaft).
- Lightly lubricate the outer bearing race and the end bell housing. Lubricate the locking mechanism threads.
- Install the end bell and use a 1″ coupling with a mallet to drive the bell onto the bearing.
- Tighten the screw at the front of the bell to lock the bearing into place.
- Inspect the rear end bell for ridges. Replace the bell if you find ridges.
- Make sure the spacer and the wavy(expansion) washer are in the end bell for installation.
- Install the rotor assembly into the main motor casing. Be sure to align your registration marks.
- Gently tap into place.
- Lubricate the thru-bolts threads with a light coat of grease before installation
- Install the rear end bell onto the shaft(make sure your spacer and wavy washers are in place. Ensure that no wires will be pinched during the installation.
- Gently tap the bell onto the shaft.
- Align the registration marks and install the four thru-bolts.
- Tighten in an opposite pattern until the bell is tight on the main motor casing.
- Check the bearing for binding by spinning the motor shaft(it should spin freely).
- Make sure the bearing is seated.
Printed courtesy of Mybusyretiredlife.com
Related Articles: My pump lost prime and Whisperflo pump seal replacement
Related Article: Whisperflo Motor Replacement
(Mybusyretiredlife.com All Rights Reserved)
(Mybusyretiredlife.com All Rights Reserved)
(Mybusyretiredlife.com All Rights Reserved)
(Mybusyretiredlife.com All Rights Reserved)
Liked This Post? You May Like These:

What are the shaft size for the pentair bearing’s?
Hello charger6850,
Thanks for the comment.
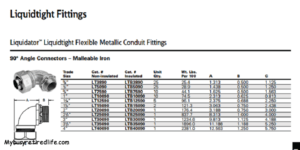
If you are talking about replacement bearings for the Whisperflo pool pump they are a 17mms ID(inside dimension) and a 40mms OD(outside dimension) and 12mms thick. If it’s for replacement bearings you will find that replacing them is pretty straightforward easily done with simple hand tools and a puller. Just be careful that when you are mounting the bearings onto the shaft to only push on the inside race, not the outside race. This method will prevent damage to the balls and the bearing races which would shorten their service life. Here is a link to bearing replacement. https://www.mybusyretiredlife.com/whisperflo-bearing-replacement/
If you have a problem where the bearing has spun on the shaft if the shaft is the least bit galled then it’s probably time for a new shaft or better yet a new motor. If you’re asking about the actual dimension of the pump shaft with it’s plus or minus tolerance dimensions I believe that is a question for the manufacturer. If you need a new motor here is a link on replacing your OEM motor with a generic replacement motor. It turned out that the generic replacement motor I used is very quiet. https://www.mybusyretiredlife.com/whisperflo-motor-replacement/
I hope this answers your question.
Ray C.
Hello.
I am at step 8 in video #2 and the screw will not budge.
I have used WD40 and put tapping the wrench with a hammer but it will not budge.
The gentleman in the video said sometimes you have to break them off … which I could do but then what happens when you re assemble the pump and the end of the screw is broken of in the housing?
Any help you can provide would be appreciated.
Thanks, Doug.
Hello Doug,
Ok, he is suggesting that you tap the head of the screw/bolt to help loosen/break the tension on it from any corrosion that has built up. He is suggesting using a nut driver. A nut driver is usually six-sided. If you don’t have a nut driver make sure that you are using a six-sided socket(less likely to strip/round the head of the bolt). Here’s a video that shows what that small bolt/screw is attached to on the other end.
https://youtu.be/nrvNZmUPRis
So if it breaks off you may still be able to get the broken piece out of the locking piece. If not then you’ll need to buy a replacement.
Ok here’s what I’d do if I was facing this type of problem.
1. tap the head of the screw/bolt with a hammer or a combination of hammer and round punch. Or if you have a ball peen hammer place the ball part of the hammer on the screw/bolt head and strike the other end with another hammer(make sure to wear safety glasses).
2. Spray the bolt head and the other end of that bolt(where the small piece that holds the bearing in place) with penetrating oil and let it sit awhile.
Turn the bolt a small amount and then tighten it and then repeat again and again turning a little more each time and keep that penetrating oil handy.
Good Luck and hope this helps
RayC