A DIY Wire Clamp Tool
A DIY wire clamp tool. Eureka! I always thought that there has to be a way to make wire work as a clamp. I recently saw a tool that does just that. What I really like about it is that no matter what size hose or object you need to clamp you will always have the right size clamp and it will clamp down on that hose or object with great and equal pressure all the way around that circumference.
The Original Tool
Here’s the first video of the Clamptite tool that inspired this article.
Multiple uses and always the right size clamp
Isn’t that tool wonderful? You take stainless steel wire and can make it work for water hoses, high-pressure air hose situations. And even better you always have the right size clamp available(as long as you have wire). The only drawback is that the tool is quite expensive.
But I’m a homeowner
I guess the old adage of the right tool for the job is true. However, as a homeowner, I would only need to use it from time to time over a decade. That’s a lot of money sitting in my toolbox for the rare occasion when I would need a clamp.
Keep it simple
I would like a homemade version of this tool that would be inexpensive but still functional. It would have to be simple(no welding, no machining, no special order parts). The following video I believe has all the criteria for a tool that does the same thing as the commercial tool. You will need a drill to drill holes for the pins and a thru hole for the threaded rod. Also, you will need to file or grind out a couple of notches in a nut and on the end of the tool to accept the wire loop for tension.
The DIY wire clamp tool
There’s something missing
Now don’t get me wrong I really like his idea of this DIY wire clamp tool. But I found his description for making this tool rather sparse. If you’re going to make this tool there is important information missing in his instructions that I believe could make or break this project.
The missing instructions
- The turnbuckle he is using is a normal turnbuckle(the only kind you can buy) with a left hand threaded side and a right hand threaded side. It’s important to know about the left-handed threads.
- He doesn’t point it out. But here’s why number one above is important. Left hand threaded parts are very rare. You should use the right-handed threaded part of the turnbuckle notched to hold the wire. Drilled out, the left-hand threaded section of the turnbuckle becomes a thru hole. Discard the left-hand threaded parts.
- He uses a nut for the sliding part which is not size specified in fact the original part(turnbuckle) is not size specified(both of these parts need to be called out for size). If you buy a turnbuckle that has 5/16 thread then buy an extended length replacement bolt(see #6 below) of the same size.
- How much do you notch out the nut?
- He also doesn’t tell you how to notch the end where the wire will be held during tightening. Also that you will need to grind this part to a narrow point.
- He doesn’t mention it but I’ll bet that he had to buy a threaded rod or an all-thread bolt for the tensioner part. Since the original threaded part of the turnbuckle is much shorter. A longer threaded section is needed to make the best use of the length of the sliding section.
- Do not use a nail(as he suggests) buy two roll pins. They are hardened and because they are roll pins have a spring-like quality to them. Also, they can stand up to the tension that this tool can exert on the wires.
- Use the wire treatment(stainless steel wire) from the original commercial tool video. The stainless steel wire is going to be rust resistant over regular steel wire.
- He calls out for a butterfly nut which is another name for a wingnut. He also is using an uncalled out washer under the wing nut to keep the nut from grinding against the turnbuckle frame when tensioning(which is a good idea).
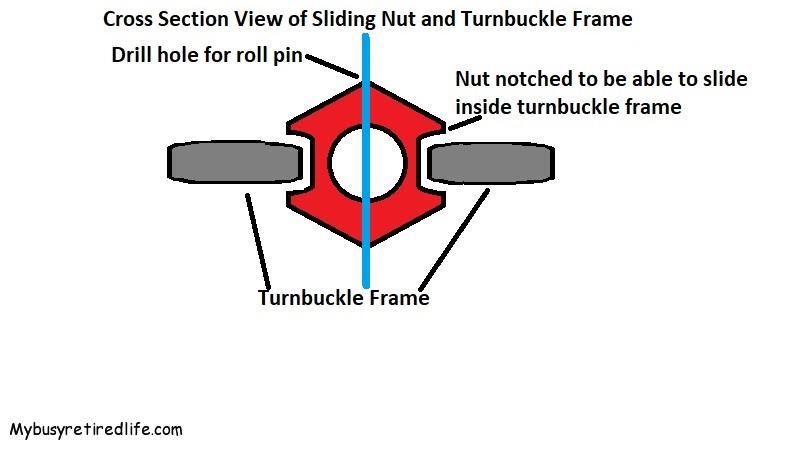
Cross section view of sliding nut details
Rock Bottom Simpler and Cheapest Tool Yet
Part #1
Part #2
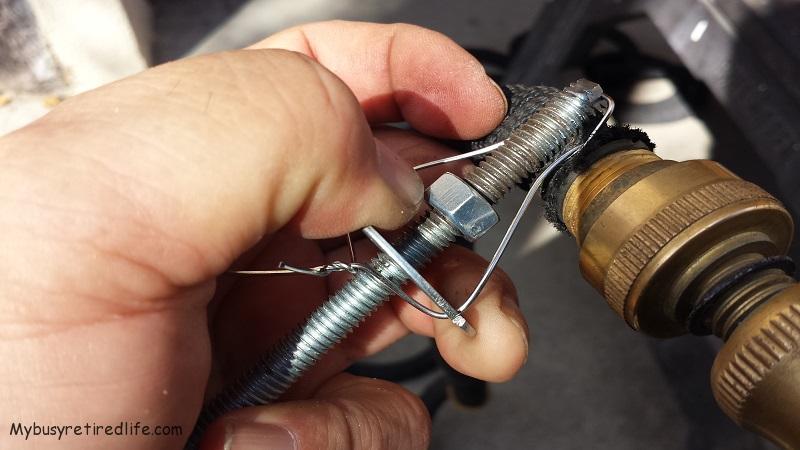
What I finally built
I finally built this last version. It is very simple with only three parts and all of them standard types(a bolt, a nut, and a fender washer). Under usage, I would say that you do have to do a little work to get the wires attached to it. So there is some fiddling to get everything hooked up. I consider it acceptable since the price is so low, that is the trade-off over the professional tool. But since I only will use it very infrequently it’s a price I’m willing to pay. The finished product(the clamp) is still the same as the professional tool. The wires wrapped tightly around the hose and when bent over and trimmed this tool produced a quality clamp.
 Simple wire clamp tool
Related Articles: More articles on tools
(Mybusyretiredlife.com All Rights Reserved)
(Mybusyretiredlife.com All Rights Reserved)
(Mybusyretiredlife.com All Rights Reserved)
Liked This Post? You May Like These:

Hellow now would this work on cars with like pressure hoses and what gage wire would be good for that and thank u for shareing
Hello Ryan,
Thank you for the comment. I’m not sure what your pressure hoses are carrying. Is it hydraulic fluid or compressed air? If it’s hydraulic fluid this is not the application for that. If you’re talking about air pressure which is usually within a hundred to a hundred and fifty pounds per square inch range then these clamps will work provided that the fitting your wrapping the wire around is a barbed fitting. The fittings must be metallic, usually brass is used but there are other types. Coated or plated steel or stainless steel fittings can also be used. The size of the hose must also be no bigger than 3/8 of an inch.
There is one last thing you must be aware of, there is a lot of energy stored in a compressed air hose. If you have ever seen an end fitting break off while the air hose is under pressure you will learn to stand back and not try to grab the hose until that energy has dissipated. As the hose can whip around and hit you multiple times before you realize that you’ve been hit for the first time.
As for the wire, the size of the stainless steel wire determines the clamps tensile strength. But a wire in the .040-.050″ range can handle anything in a compressed air application, provided all the other criteria mentioned above have been met. Remember that a properly installed and tensioned wire clamp will have two full winds on each side of the clamp holding the hose and fitting together.
If you’re interested here is A Layman’s General Guide To Stainless Wire
Hope this answered your questions. Again thanks for the comment and good luck on your endeavors.
RayC
I did some similar research recently for a power steering hose repair I was doing that a hose clamp just wouldn’t seal. Somewhere along the line, fortunately before I got to fabricating my own tool, somebody’s post in a comment section such as this pointed out that a pop rivet gun can be used to do the same thing. That is how I have done all kinds of hose end wraps ever since. Water hose and air hose repairs done this way, have all turned out well.
Per the guy’s comment, I cut a piece of ~20 awg stainless steel wire to a length that goes around the hose twice and leaves about 8″ or 10″ extra. I pull it out straight and then fold it in the middle. Starting at the fold, I wrap the wire around the hose twice and bring the ends back through the mid fold settling the spirals as nicely as I can, then I twist the two free ends together down to the end but starting at the hose. Then I insert the twisted pair into the mouth of the pop rivet tool and establish a grip on it. Then I pull it tight like a pop rivet (caution & a developed technique is needed, so as to stop before the wire breaks) and then bend the free ends over away from the direction of the mid fold and cut them off. A bit of dressing of the cut ends with long nose pliers sets the sharp ends into the hose and the whole thing becomes part of the hose and leaves nothing for snagging on hands or other obstacles which alone makes it far superior to a hose clamp in my books.
Hope this is of interest.
Cheers!
Hello Brian,
First thing thank you for the comment. Your suggestion presents a new take on the hose clamp tool. It looks like I’ll need to dust off my pop rivet gun in the near future.
RayC