Air Leak in SuperFlo Pool Pump
My neighbor had an air leak in SuperFlo pool pump and needed help. We had replaced his pump seal and all the O-ring/seals, and both motor bearings and after starting it up it was drawing air into the water. He showed me the air bubbles at the return jet and it was clear that there was definitely air getting into the system somewhere.
Is this what you see at your pool’s return jets?
Clarification
This troubleshooting procedure will work for any pool pump. It just happens that this was a SuperFlo pump.
Troubleshooting the problem
Finding an air leak in the system is pretty simple if you think about it. There is only one way that air enters the system. There has to be a hole/crack through which the air can enter the system. But where in the system do you find it? There are a lot of pipes, a filter, a chlorinator, a heater, valves, and fittings to look at right? Wrong.
Divide it in half
When your system develops air leaks you need to divide your system in half. Let me explain. There are two parts to the pool water system. There is the suction side and there is the pressure side. Yes I know you can get cracks in any part of the system but each half of the system will display the leak differently.

The pressure side and suction side of the system are divided by the pool pump. Generally speaking, anything upstream of the pump is the suction side. Anything downstream of the pump is the pressure side. So what part of the system is the pump on? Actually, it’s on both sides of the system.
Pressure side
Anything after the pool pump is on the pressure side part of the system. Any leaks on this side of the system will have water coming out of them as long as the pump is running. There is no way that air can enter the system on the pressure side as long as the pump is running.
Suction side
The suction side of the pump is where air will enter the system. The suction side of the system actually starts at the pool pump’s impeller. The impeller draws in the water(suction) and expels it(pressure). So anything upstream of the impeller is the suction side. See the video below for the impeller.
What do we check first
Troubleshooting a problem always begins with the discovery that something isn’t working properly. In this case, we had air in the returning pool water. It was not leaking water. So it was time to check the suction side of the pool pump system.
I have been taught to always begin with the simplest/smallest fix/solutions first.
The simplest fix is to check that all the connections on the suction side of the pump are tight. So I grabbed my strap wrench and tightened all the fittings on the suction side while the pump was running. Then I checked the status of the air bubbles at the return jets. No change.
The next thing to check was that the new O-rings/seals had not been nicked when we installed them. In this case, the only O-ring/seal on the suction side was the pump basket lid O-ring. When I pulled the lid and removed the O-ring the lid was extremely dirty. I began to clean it while my neighbor checked the O-ring. Cleaning the lid of dirt found the problem. The outer part of the lid that backs up the O-ring for the basket was severely cracked. It had been hidden by the pool pump lid clamp. My neighbor needed a new pump basket lid.
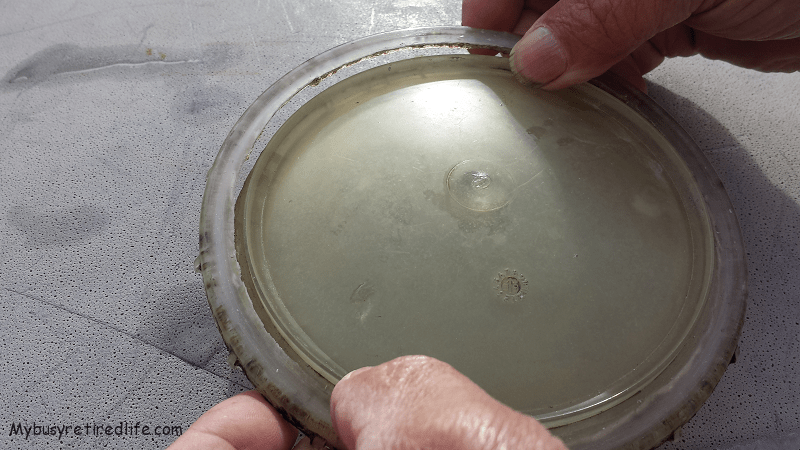
Big crack in pump basket lid
A simple visual check for air leaks
There is a technique for visually checking for air leaks. It works by using the built up pressure in the system to find the leak. It is simple, by turning off the pump the back pressure causes the water to momentarily squirt out of the air leak crack. You may need to do this several times to find the leak. Get a helper to turn the pump on and off if needed.
The following video shows how the back pressure causes the water to squirt out of the leaking spot when the pump is shut off. It also shows you how to disassemble the three-way valve and O-ring replacement. The video shows you how to use silicone to seal air leaks at the place where the fitting screws into the pump. In the video, he advocates using PVC cement to seal any previously glued connections. Note that he is using the glue on previously glued connections and NOT connections that screw together(you will need to disassemble these connections at some point).
<
What to check in order
- Tighten the pool pump basket lid
- Tighten all fittings on the suction side
- Check O-ring for nicks
- Check all O-ring contact surfaces for cleanliness or cracks
- Remove the union fittings and check all the O-rings for cracks
- Inspect all PVC pipe connections for solid glue connections
- If the unions thread onto the pipe or pump remove them and inspect for cracks
- Install unions with new pipe dope for PVC
- Inspect the valves(if any) for cracks, tightness, and possible leaks at the handle shaft and where the body of the valve comes together. Replace O-rings at the handle shaft and body if needed.
Conclusion
We ordered the replacement lid and installed it along with a new O-ring. Success, there was no sign of the air bubbles at the return jets. My neighbor was very happy.
Related Articles: Swimming Pool Articles
(Mybusyretiredlife.com All Rights Reserved)
(Mybusyretiredlife.com All Rights Reserved)
(Mybusyretiredlife.com All Rights Reserved)
Liked This Post? You May Like These:
