BiFold Door Mod (Narrower)
I needed a bifold door mod recently. This article will cover why I needed a mod, and how I accomplished it. It does not cover the installation of the doors which is in another article.
Why I needed a Door Mod
The finished bifold doors project would block part of the house from our cats. My problem was that the door opening width I had to work with is nonstandard at forty-seven inches. A forty-eight-inch bifold door will not fit. I had two options, break out the walls and resize the opening or it would have to be a custom-made(meaning plenty of money) door. Or…… possibly there is a third option.
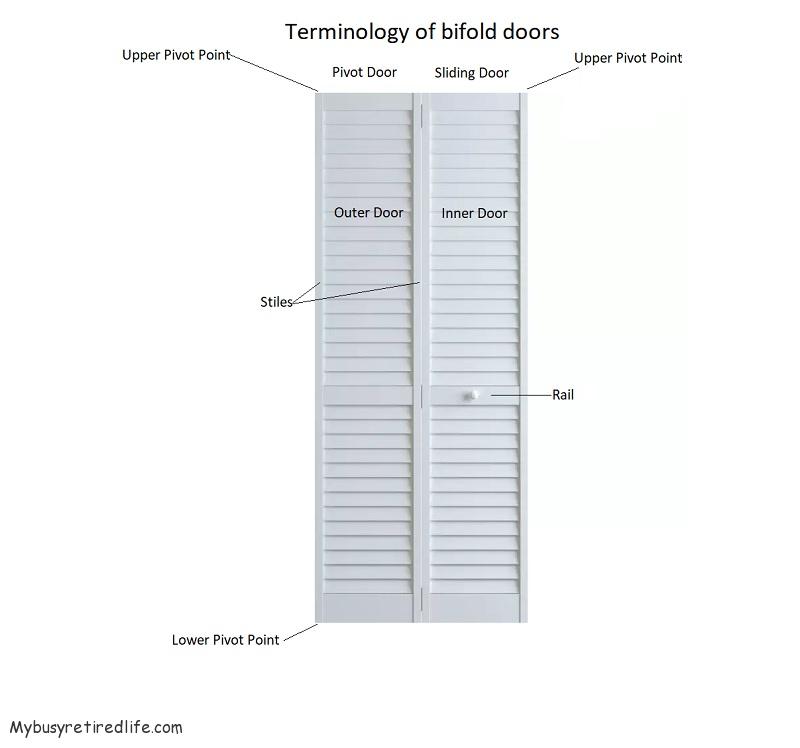 Terminology of bifold doors
![]()
A third option
My wallet does not like the sound of custom-made. Perhaps there might be a third option. I needed a solution on how to fit a standard “off the shelf” forty-eight-inch wide door in a forty-seven-inch space.
Determine where to remove material
I looked at the construction of the bifold door. It has pivot point holes drilled at the ends of the doors so no modifications were possible at those points. The only place with removable material(to make it narrower) is where they hinge. The stiles of the doors at that point had to be wide enough and made of wood in order for this mod to work.
Watch that pivot
Measure three places at the proposed door opening. Don’t forget to measure at the baseboard. That will probably be your smallest opening.
My last criteria on my list was that they(the doors) needed to allow air to continue to move from one section of the house to the other. There are no return ducts in that part of the house so the doors needed to be louvered so as not to interfere with the operation of the HVAC system. So I need louvered doors finished on both sides.
So I started looking for doors that fit my criteria. Eventually, I found a pair of plantation-style doors that fit all the criteria. They had enough material in the center stiles, they were louvered and finished on both sides.
The Bifold door Mod
What I needed to do to get the doors to the right size.
- Rip cut the doors to the proper width.
- A table saw is needed for this modification, I used an old radial arm saw.
- A feather board is needed to keep the door pushed into the fence. The feather board will ensure that the finished cut is straight.
- I needed to apply masking tape to both surfaces where the cut will occur to minimize splintering caused by the blade.
- To keep the cut as smooth as possible use a new rip cut blade or a new plywood blade. A brand new ripping blade with 40 teeth is a good choice. Also, a new plywood blade with the most teeth(non-carbide) that you can find will work.
- Round over the cut edges (remove the masking tape first) with a router and a round-over bit to match the round over on the original uncut edges.
- Predrill the hinge screws to prevent wood splitting.
- Install the old hinge screws checking that the screw length still works for the resized stiles(replace with shorter screws if needed).
- Remove the screws
- Sand the cut edges smooth.
- Paint to match(take a sample to the paint store and have them match it for color and sheen).
- Reinstall the hinges once the paint is dry.
- Check the doors for opening and closing noise(noise indicates that the hinges are not quite lined up to each other). I found some noise and sprayed each hinge with silicone lubrication spray. The noise is gone and there is no residue.
Installation
My doors were now narrow enough to fit in the opening. Afterward, I installed the doors according to the manufacturer’s instructions see the link below on the installation.
Related Article: Bifold door Installation
Related Article: The 5 Most Useful Power Tools
