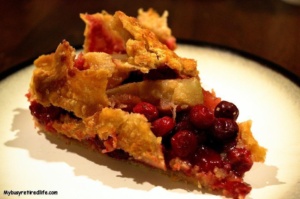
Perfecting The Flaky Pie Crust
There is nothing like a flaky pie crust. I have always considered the pie to be at the top of the dessert world. No cake or cookie could hold a candle to the richness of the pie filling accented by a truly flaky pie crust.
When I retired I thought now I have the time to bake some really great pies. So I was wondering where to start. I felt that a good foundation would have to be a good crust. The perfect fillings would have to come later.
My wife has cookbooks and the internet has plenty of websites dedicated to getting you the perfect recipe. I went to a website and armed with the logic that if it’s really popular it should really be good and that my search for the perfect crust should be over quickly.
Boy, was I wrong! I followed the instructions to the letter. What I got was a good crust, but it was not the right crust. I wanted a really flaky crust, easily identifiable when the fork meets the crust, my perfect pie crust.
I tried recipe after recipe looking at the type of fat as the possible culprit to my continuing disappointments. Butter, margarine, shortening, lard, and oil, they all disappointed. Now don’t get me wrong these were good crusts but not what I wanted. It took a year of baking to get to the perfect crust.
The Perfect Crust
I started looking in a new direction at what could be done to improve my results. The final recipe needed to be repeatable time after time. I started keeping a list of techniques each pie crust recipe called upon.
What Do You Mean It Has To Look Like Corn Meal!
Most of the recipes called out that the blending of the dry ingredients with the fat should look like cornmeal or breadcrumbs. Mistake #1 if you want flaky crust you need to have pockets of fat within your dough. Cornmeal or breadcrumbs do not look like that. Your mixture should look like you have small peas in your dry ingredients. You can use two knives, a pastry blender, or food processor, and anything in between to cut in the fat. But stop when you get to pea-sized pieces.
 Do I Really Need Mittens To Make Pie Crust!
When you cut in the fat the temperature of all the ingredients will change how well the fat stays separated from the dry ingredients. So make sure everything is cold including your flour. You’re fat should be really cold. One recipe I found called for frozen butter run through a grater, the ultimate coldest technique. Your water should be near freezing. I use the crushed ice feature on my refrigerator and add it to my water. I let the water sit in the refrigerator for short amount of time(15mins) so that it can get really cold. When I combine the dry ingredients with the water I am not afraid to have some crushed ice mixed in with the water.
The French Have The Last Word!
By now I have looked at a ton of recipes and I noticed that one called for vinegar. What! This can’t be, why would anyone want a pickling agent in their pie crust. I tried it just to see what it would do. I used all the techniques, with the vinegar added recipe and noticed that the flakiness was still there combined with smaller pockets, best of both worlds.
What Did I Learn At Pie Crust University?
- It’s not the ingredients, it’s the techniques that make the difference.
- The size of the fat in your dry ingredients needs to be as small as a pea.
- Everything has to be cold and some ingredients close to freezing.
- Vinegar is a good thing in pie crust.
Once your wet and dry ingredients are combined your dough will need special handling.
Keep That Dough Flaky
Once you have that dough made it will need special handling. You will need to reshape it for later rolling pin action. Divide your dough in half. The upper crust is shaped into a disk shape and wrapped in plastic wrap. The lower crust is formed into a log shape and wrapped with plastic wrap for the no rolling pin method. Place the wrapped dough in the refrigerator for 5 hours minimum or overnight even better. Smaller diameter logs work best.
The No Rolling Pin Method
For the bottom crust, I like to use a no rolling pin technique. The log shape allows this technique to work beautifully. Take the bottom crust and slice your chilled log into thin slices. About a ¼ inch thick. Place the slices into your prepared pie plate edge touching edge. Don’t be afraid to squeeze them a little. Press the edges together to fill the voids and form a seamless crust.
But I Like Rolling Out My Dough
If you like rolling out your dough from discs. Chill as above. Place the round cold dough on a well-floured silicone pastry mat. Roll out to your pie plate size. The crust can be easily peeled off the mat by inverting, and centering the dough over the pie plate and starting a separation at the edge of the dough slowly peeling the silicone mat from the crust.
Using the two pie plate method works best for me. You will need two identical pie plates. Invert one pie plate. Place the dough over the inverted pie plate. Yes, that’s right it’s on the wrong side of the pie plate. Now take your second pie plate, make sure it is properly prepared, and place it on the dough so that the dough is sandwiched between the two pie plates. Upright the pie plates and remove the first pie plate. Your dough is now in your pie plate without tears and it’s ready for filling. 
Well almost! Don’t forget to lightly brush the bottom crust with egg yolk before you add the filling. The egg yolk will act as a barrier to keep the crust from getting soggy. Don’t forget to brush the top crust with egg white before you slip it into the oven the egg white will give a lovely appearance to your perfect flaky pie crust.
Liked This Post? You May Like These:
