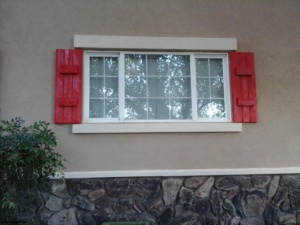
Foam for your home’s exterior
I want foam accent pieces instead of wood for my home exterior. Building materials have progressed in the 40+ years since my house was built. I’ve lived in my home for most of those 40+ years. The home is stucco covered. The lower part of the front covered with that 70’s style fake rock.

Thru the years it has required paint from time to time. Painting is not one of those things I like to do but it protects the wood. But no amount of paint will keep water from penetrating over time into the wood.
Eventually, some of the wood began to show signs of rotting. I felt it was time to replace the rotting wood and give the house a much-needed facelift that would bring it into this century. It was time for foam.
Actually, it was time for more than foam. The doors needed replacing and a good color coat would round out the face lift. But that’s another story. This is about foam. Foam is not going to rot and so it has a big advantage over wood. It’s also can be painted or covered with stucco.
I have worked with stucco when I replaced all the windows in the house. I found that my quality of work with stucco is suitable for what I would consider rough work. This is not good enough for a finish coat of stucco. I knew that I would be in over my head if I attempted the job.
Time To Get A Professional
Lucky me, I have a retired neighbor that worked with stucco. I watched him put a facelift on his own home. The quality of his work was excellent. He takes on jobs from time to time so I asked him if he was interested in my project. He was interested and became a good resource.
Start The Design Process, Decisions, Decisions
The wife and I started the process by driving to the newer neighborhoods where the homes had foam trim details. We talked about what was appropriate for the style of our home(a ranch style home) and came to the conclusion that we wanted a header above the windows and a sill below. The header would be larger than the sill with the ends square cut. The header and the sill horizontal dimension would extend beyond the window edge. All elements at the windows would be set back 3/4″ from the window edge. The windows would not be completely encircled by the foam as is a popular practice in this area.
The windows in the front of the home would have foam shutters. The shutters would have a wood type look to them. Paint covered the shutters. Above the fake rock, the wood was removed. A foam piece mimicking the wood would take its place. All the doors would have the sides in a 2X4 and the header size matching the windows. All foam elements except the shutters would be stucco coated to reduce maintenance.
Acquiring The Foam
I went to the place my neighbor had recommended for the foam. They stocked 2″X4″ X8′ and 2″X6″ X8′ type sticks of foam on the shelf other pieces were on a special order basis. I asked about the sill and the piece above the fake rock. The sizes I was looking for did not exist. They explained that if I could come up with a drawing they would send it to the manufacturer who would quote me on the number of pieces needed. High school draft classes to the rescue.
Sketching Up the Custom Pieces

I had sketched a drawing very similar to this one for the window sill and the pieces over the fake rock. This drawing illustrates what the piece would look like if you were looking at it from the front and the end of the piece. I put in dimensions for each of the edges. I also needed a drip feature so that water could not run back into the house. That’s what the half-circle at the bottom of the side view accomplishes. Water runs down the outer surface and tries to run back toward the house. That’s where the water meets this half-circle, it stops, collects, and drops to the ground. The simple sketch did the job. This gave me a quote from the manufacturer for the needed parts.
The end results were worth the time and effort. If this type of project is in your future I highly recommend it whether you do it yourself or do as I did and let a professional do it.
More information: How to install

Finished foam window treatment

New door with foam treatment
(Mybusyretiredlife.com All rights reserved)
(Mybusyretiredlife.com All Rights Reserved)
(Mybusyretiredlife.com All rights reserved)
(Mybusyretiredlife.com All rights reserved)
(Mybusyretiredlife.com All rights reserved)

