Texturing Techniques on Drywall
I learned how to apply texturing techniques on drywall by trial and error. Matching a texture is all about the mud viscosity and the mud gun’s air pressure and the volume of mud, the mud gun delivers when you pull the trigger. All of these parameters are adjustable. All this said you need an air compressor that can deliver 4-6 CFM at 50-70 PSI. Check your air compressor ratings before buying a mud gun.
Definition of Drywall Mud
Joint compound (also known as drywall compound or Mastic) is a white powder of primarily gypsum dust mixed with water to form a mud the consistency of cake frosting, which is used with paper or fiber joint tape to seal joints between sheets of drywall to create a seamless base for paint on interior walls. It is often referred to simply as mud or as joint cement.
From Wikipedia, the free encyclopedia, https://en.wikipedia.org/wiki/Joint_compound
In order for the texture/mud gun to work properly, the viscosity of the mud must match that of thick paint/thin pancake batter. I have a short video below that will give you a visual sample of what the mud viscosity must be like when it’s ready for the mud gun.
Viscosity Update 6/2018
It was pointed out that I didn’t give a rationale for the viscosity of the mud needing to be what it is. The best way to explain this is with extremes of viscosity. It is really important that the consistency of the viscosity be the same from batch to batch. Your working with a gravity feed system.
Too Thick
Let’s examine an extreme with the viscosity being very thick or sticky. The mud will not want to run easily from the hopper to the nozzle reservoir area. The reservoir would fill with mud slowly and be able to lay down a pattern then the reservoir would empty as you laid down the pattern. Then because the viscosity is so thick it couldn’t keep up and would stop. You would get a skip of the pattern. Also, the pattern material would start out heavy(full reservoir) and fade to light(as it emptied). This would repeat over and over as the reservoir filled and emptied.
Too Thin
Let’s take it to the other side of the extreme. Too thin, (almost like water) here the mud would run very easily from the hopper to the nozzle reservoir. But the problem with too thin would show up in how the mud acted when it hit the drywall. Since it is so water like it may act like spray paint and flatten into an almost flat smooth pattern.
What your shooting for is in between these two viscosities. You want the material to be able to keep the reservoir at the nozzle full as you lay down your pattern. But not so thin a viscosity as to have the mud flatten as it hits the drywall.
To prep the mud I use a small bucket(enough volume for the mud gun) and my drill with a mixing attachment. I add small amounts of warm water to the mud and mix with the drill attachment. I use my hand to determine if the viscosity is right. Lifting a handful of mud out of the bucket and watching it as it pours back in. Also while my hand is in the mud I can check if all the small lumps have been broken down.
A Review of the above mud gun
You cannot beat not only the price of this tool, but the quality. You would think for this low price, you would be giving up some quality or maybe get a tool that is not up to the task it claims to be able to do…but you would be wrong. This hopper is terrific. Worked every bit as good as my much more expensive hopper (that I loaned to a friend and cannot seem to get it back from him easily). Worked like a charm, did not clog and felt like quality in my hands. This thing will more than pay for itself. I used simple drywall mud, thinned out with water and in no time, had an entire room completed with expert looking knock-down texture on my walls.
If you are even somewhat thinking of using those aerosol store bought knock down spray cans or kits from your local big box hardware store, then change your mind now and don’t do it. Instead, buy this item and watch a couple of youtube videos on how to work it properly, and you will be an expert within seconds of using it. You can NOT mess this up, as worse case you make a mistake or don’t like your results, scrape off your texture with a putty knife and try it again.
Also, using this hopper with regular inexpensive drywall mud is way cheaper than those specialty spray system you see in the stores. With this tool and a five (5) gallon bucket of drywall mud costing $13, is enough to do several hundred feet of 9″ high walls in heavy texture with ease. You don’t even have to be a well experienced do-it-yourselfer to learn how to texture your own walls with this cool tool.
I highly recommend this item. It will save you a lot of money over those wall texture kits, and a butt-load of money over having to pay someone else to do this simple job yourself. Give it a try…you will not be sorry.
By skar on February 6, 2016
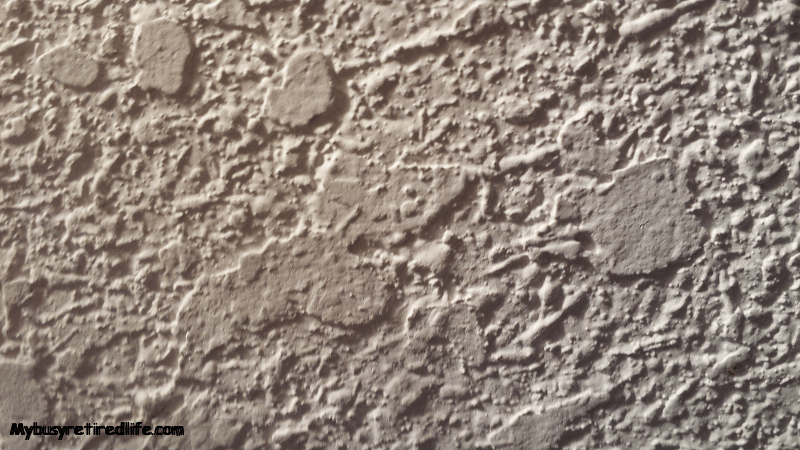
Be observant to get the perfect match
I look at the existing wall texture and look for the characteristics that I need to mimic in my repair. Does the texture have a knockdown appearance? Does the texture appear to be small lumps, medium lumps, large lumps, or a combination of lumps sizes? Are all the lumps very soft in appearance with everyone being rounded but not knocked down?
Adjustments
This visual information will tell me what air pressure to use and how much volume I need to get my desired pattern. My starting point after mixing the mud for viscosity is air pressure. I start out at about 40 psi. of air pressure. At this setting with the gun restricting the mudflow(low volume), I will usually get small lumps on the practice piece. If I need larger pieces I will lower the air pressure by 5-15 psi. Usually going down in psi to about 20-25 psi. to get really large lumps. So my process is to adjust air pressure first and volume last to get the desired results.
Use a practice piece
To test the gun air pressure and volume controls I use a piece of cardboard vertically to mimic the wall and shoot a practice pattern. I adjust the pressure down or up and volume until the pattern is what I am looking for. If it doesn’t match on the first try I scrape off the wet mud and make my adjustments and try again. I keep repeating until I have the pattern I need.
Two light coats are better than one heavy coat for non-knockdown texture. Spray on a lite coat of lumps and let them dry. Scrape off any high spots with a taping knife. Inspect your work closely and determine if you need a second lite coat or if the coat needs to be slightly heavier.
Layer for more depth
If the lumps are of different sizes(for example) a set of very small and a mix of medium lumps. Shoot the smallest lumps first. Allow them to dry completely. Then shoot a second layer of the larger lumps on top of the smaller lumps after they have fully dried. Always scrape off any lumps that are unusually high after everything has dried between layers. A good ten-twelve-inch taping knife or a knockdown blade will work well for this task
Keeping the mud in the mud gun between coats is pretty easy. Have an old towel wet and wrung out to cover the top of the hopper between coats. This wet towel method will keep the mud from drying out and changing viscosity.
Knockdown technique
Knockdown texture is a time-based operation balanced with the pressure of the knockdown knife during the knockdown process. Look at the islands(the flat areas) you want to create. The smaller the islands the longer you will wait for the drywall to dry before knocking it down. The larger the islands the sooner you knock them down after texturing.
Time for knockdown?
For a knockdown texture wait for the lumps to be almost dry before you knock them down for very small islands. The longer the time from texturing to knocking down will result in smaller flat islands. If you knock them down to early you create large islands that could connect/combine and the whole texture will look almost flat. Again, use a practice piece to determine what that time factor will be. A good curved large knockdown knife will provide excellent results. Don’t try to do this with a small taping knife. It can leave tracks the eye can follow in your pattern.
If you start out your knockdown process by going up and down to knock down the texture stay with that method. Don’t change your direction and start going side to side as the islands will reflect the different directions. Remember to clean the edge of the knockdown blade occasionally to prevent the blade buildup from creating tracks in your knockdown. A damp rag or old towel will work well for this cleaning method.
Pressure on the knockdown knife
Pressure on the knockdown knife is critical to your getting a good match on your new texture. A slight pressure will get you smaller islands while a high pressure could yield very large to an almost smooth surface. Pressure becomes less critical if you wait before knocking down your high spots. This is because the mud does not have as much moisture and will not flatten as easily.
Soft bump texture
All soft bumps on your texture? This is a pretty simple process, very similar to knockdown texture. Again try this on your practice piece to get the best results. Shoot the piece for your bump/lump size. Allow it to partially dry and then instead of a knockdown knife roll a clean paint roller over the bumps to soften them. Again pressure is critical when running the roller over the bumps.
Related Articles: Drywall Prepping, Patching, Sanding, etc.
(Mybusyretiredlife.com All Rights Reserved)
(Mybusyretiredlife.com All Rights Reserved)
Liked This Post? You May Like These:

Very nice article, however it lacks the one thing I can’t find anywhere, what effect does the mud consistency have on the texture? This is, if it is a bit on the loose or stiff side what does it do. The other question is how much difference will i see with a purpose made texture mud compared to a thinned all purpose mud or even a setting type?(I imagine setting type is avoided for use in most pumps and guns do to getting them clean in time, better used for manual textures)
Hello,
First I want to thank you for the comment.
The first question is about the consistency of the mud and how it affects the process of texturing. The right term I feel would be viscosity or how easily the mud will flow from the hopper to the reservoir at the nozzle area. It is really important that the consistency of the viscosity be the same from batch to batch. Your working with a gravity feed system. Think about an extreme in the viscosity being very thick or sticky. The mud will not want to run easily from the hopper to the nozzle reservoir area. You would get some mud in the reservoir and be able to lay down a pattern then the reservoir would empty and the pattern would stop and your pattern would get a skip of the pattern. The pattern would start out heavy and fade to light. This would repeat over and over as the reservoir filled and emptied.
Let’s take it to the other side of the extreme. Too thin, here the mud would run very easily from the hopper to the nozzle reservoir. Not bad you would think. But the problem would show up in how the mud acted when it hit the wall. Since it is so water like it may act like paint and flatten into an almost flat pattern.
These two extremes are very easy to create and easy to check on a practice piece of cardboard to simulate your wall.
The second question is why a general purpose mud over a special use type mud. Well, this is my logic. I always have a box(not a bucket) of the general purpose mud around. It’s handy, stores well, it’s the least expensive, and since I’m not looking for speed setting up, non-shrinking, or covering cracks(already done at the texturing point) it gets the nod. But if you have some sitting in the garage(with the exception of the setting variety) and it’s enough for your project use it up. Just make sure the viscosity is the same from batch to batch.
I hope this answers your questions,
RayC.