Building a deck

Building a deck takes time and effort. Time and effort that you will enjoy for many years. I have such a deck that has stood for more than 35 years. But recently the deck has shown its age and is in need of rebuilding. This time there are new materials that will provide additional protection to the wood that I plan on using.
Strong post stringer connections
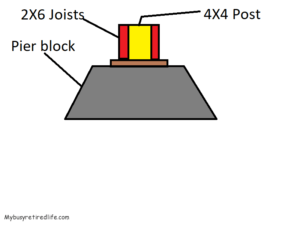
My deck is low and not much higher than the concrete pool deck it is near. So my 2×6 stringer to post connections were not very complex. I basically created box beams.
box beam – a beam built up from boards; has a hollow rectangular cross section
(Building) another name for box girder
The Free Dictionary: box beam
Box Beam Spacing
I spaced the box beams at approximately two feet apart. Way overkill but I can put the heaviest items on this deck and have no worries about weight. Virtually all flex has been removed. It feels like I am standing on concrete, I love that feeling.
All the posts are attached to the wood block on the top of the pier blocks. The stringers sandwich the posts with all the parts resting on the woodblock of the pier block. I purposely made my posts longer than needed and after attaching the stringers saw cut the tops off. I did this so that the posts and stringers would be at the same level. This way no one part is lower that could create a catch basin effect for water to collect at these connections. Cutting off the excess post is easily done using an extra wide wood blade on a reciprocating saw.
If your deck project has the deck higher than mine where the box beam will not rest on the pier blocks look at the short video below on how to properly create the beam and attach the beam to the post.
Video on how to mount stringers to Post
Make or buy your own pier blocks
My home being in California I do not have to worry about ground frost heaving. If you live in an area where you have ground freezing conditions you will need to know the depth of your frost before setting your pier blocks. Any pier block must be below the frost line to prevent frost heaving from ruining your deck. So, in this case, you would need to make or pour your piers to below the frost line.
Frost heaving (or a frost heave) is an upwards swelling of soil during freezing conditions caused by an increasing presence of ice as it grows towards the surface, upwards from the depth in the soil where freezing temperatures have penetrated into the soil (the freezing front or freezing boundary).
From Wikipedia, the free encyclopedia https://en.wikipedia.org/wiki/Frost_heaving
Installing the pier blocks
For my new deck, I changed the design. I already had a bunch of existing pier blocks from the old deck and only needed to buy a few to make it work. So I purchased them and proceeded to install them in a new configuration of the redesigned deck. I started at the highest point of the concrete pool deck the new deck was going to overlap. As I installed each pier block I made sure that each block was level to at least two other pier blocks and that each pier block was level in both directions. A four-foot level worked well for the block to block part of the construction. A torpedo level worked well for leveling the block in both directions.
This basically ensured that I would have a level surface to build my box beams on. A shovel helped me get the pier blocks close to their final elevation. I used my shop vacuum to remove the last amounts of dirt so as not to disturb it. This made sure that each pier block was resting on compacted undisturbed soil. I used a shovel to lever the block into final horizontal positions. Once I had them in position, I poured the soil back around the pier block and compacted it around each block. I then covered it with landscape fabric and rock to prevent weed growth under the deck.
Video on making your own pier blocks
Cantilevering the outer edges of the deck
My new deck is a floating type deck. That means that it is not connected to the house in any way. The framework was very simple for a floating deck. As long as the stringers(box beams) are under the deck boards there is plenty of support. The problem is that I have concrete under two edges and I would like my deck to come out to and cover part of that concrete. That means that part of the deck will not be supported by pier blocks directly under the outer stringer/skirt board. That section of the deck will be cantilevered over the existing concrete pool deck. So I needed to come up with a method to support the deck, and the outer stringer/skirt board at these points. When it is finished it will have be rock solid was my only criteria.
Construction of a barge rafter with lookouts
The Barge Rafter
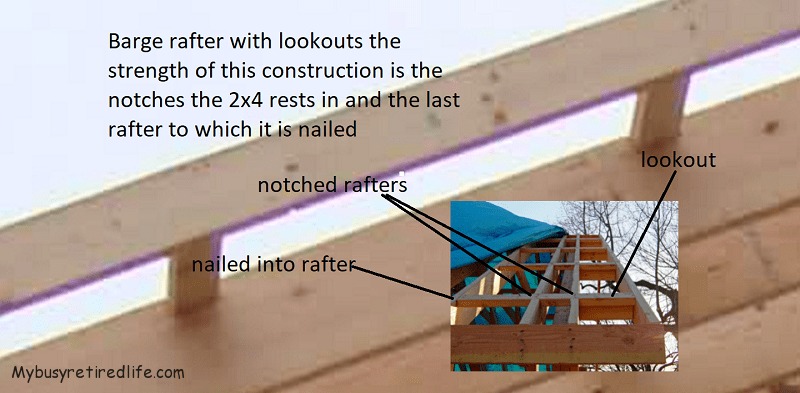
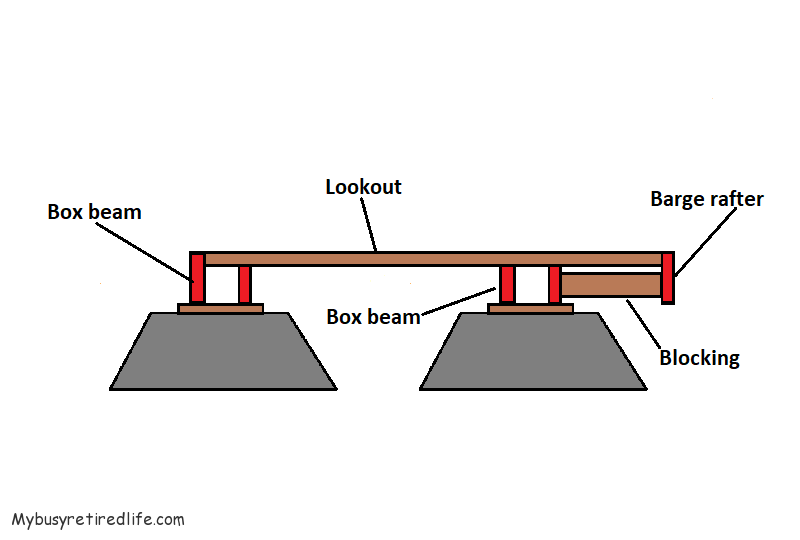
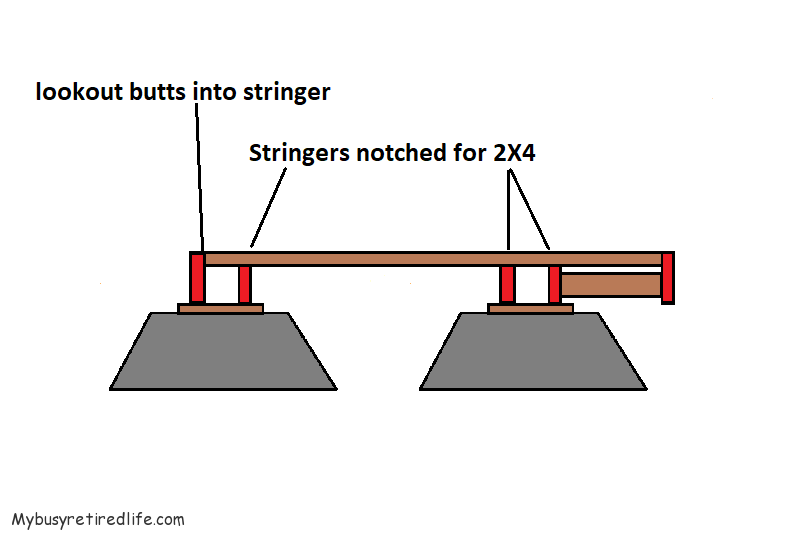
I had looked at my house and had noticed that the end of the gable roof overhang is not supported but cantilevered out. The cantileverd section was over two feet. I only needed to cantilever my deck about a foot or less. I looked up this kind of construction and it is called a barge rafter. The roof sheathing(will be the deck boards in my case) and a couple of 2x4s called the “lookouts” supports the barge rafter(skirt board in my case).
The cantilever of the roof is several feet. For my deck, the cantilever is about one foot. So I used the lookout construction technique for 3 lookouts in less than 8 feet of length. I also added a vertically placed supporting 2×4 block under each lookout to support the bottom of the skirt board from being pushed back toward the box beam.
Building the barge rafter


Learning from my mistakes
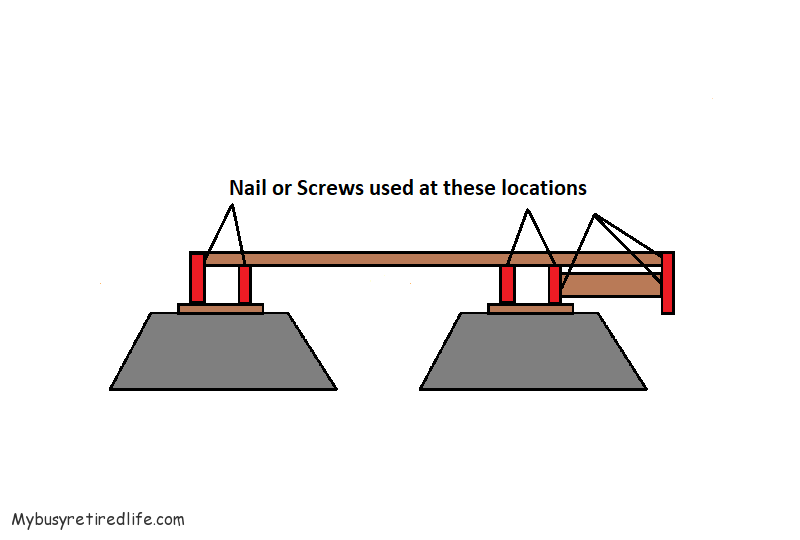
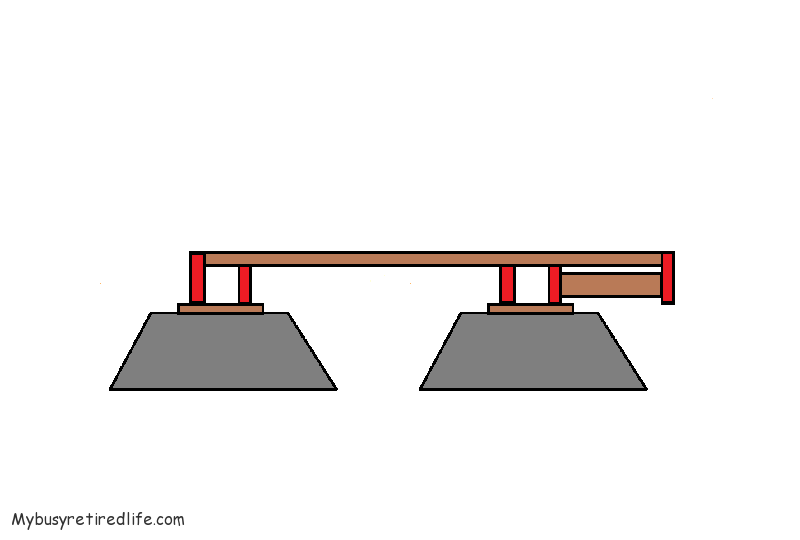
I originally had the outlooks going from the first box beam to the barge rafter. This construction was not very stiff. The lookout was levering the box beam. Extending the lookouts from the first box beam to the next box beam removed any levering at the first box beam. It really stiffened everything beautifully. When it was finished(lookouts connected to both box beams) I could stand on the skirt board without decking and it was rock solid.
When I frame those, I install 2×4′ or 2×6’s outlookers every 3-4′ flat notched into the rafters flush at the top and then 2x’s on edge the width of the overhang.
Joe Carola reply to Stupid HO Question http://www.contractortalk.com/f14/stupid-ho-question-13964/
Dealing with warped wood
This became a big deal for me. Since I was reusing old deck boards warped or bowed boards were what I was facing. After some experimentation, I needed to come up with a cheap tool to help straighten these boards. This is what I came up with. I made two of them. If you need more information on how it is put together here is a link to that article.
Video on my DIY board straightener
Methods to increase longevity
Caulk
Flashing
Deck materials
Decking details
Deck over coating
This material is totally new to me. I like that I can get it custom color matched. I have another deck with composite decking and matching the color to that deck will unify the two decks even if they are of different materials. Since I do not have any experience with this material this is about all I can say about it for now. My hope is that it will go on thick, stay that way, and stick to the deck forever.
The final choice
At this point, this sounds like a good material to use on decking but after reading the reviews on this material and other similar materials there are just too many negative reviews. It seems that the material and the wood have different expansion contraction rates which result in separation of the coating from the deck boards. It’s either that or preparation protocols are not narrow enough to guaranty 100% adhesion. So I am opting out of using it. Maybe in the future, they can fine tune out the problems they are having with it now(Oct/2017). So it looks like a stain will be applied for now, probably a solid stain.
Deckover Video
Additional Information
Related Article: Deck Construction DIY Spacers
Related Article: Deck Construction How To Straighten Bowed Boards
(Mybusyretiredlife.com All Rights Reserved)
(Mybusyretiredlife.com All Rights Reserved)
(Mybusyretiredlife.com All Rights Reserved)
(Mybusyretiredlife.com All Rights Reserved)
(Mybusyretiredlife.com All Rights Reserved)
(Mybusyretiredlife.com All Rights Reserved)
(Mybusyretiredlife.com All Rights Reserved)
(Mybusyretiredlife.com All Rights Reserved)
Liked This Post? You May Like These:
